
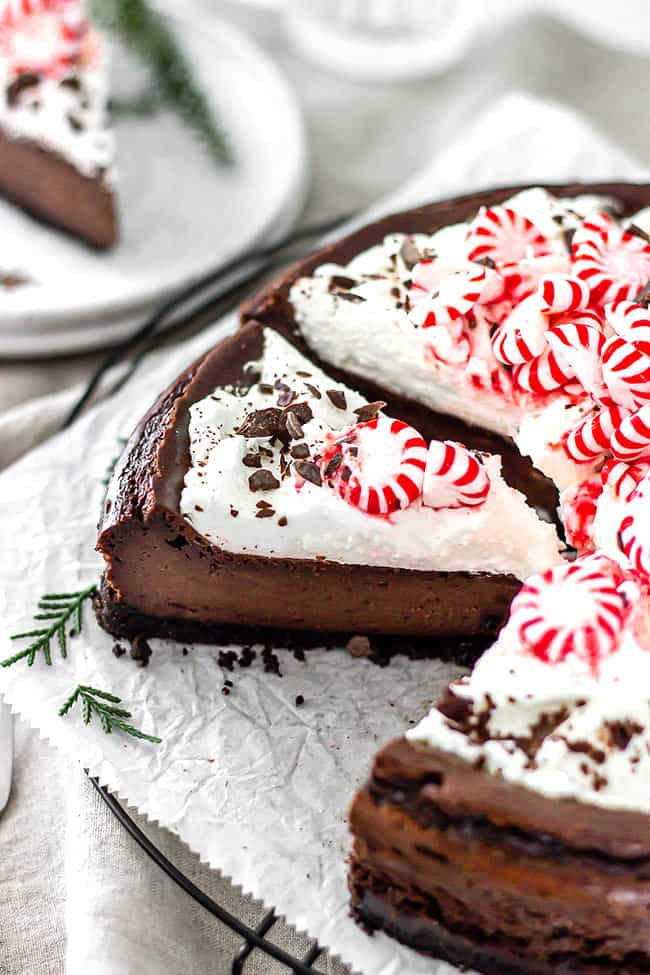
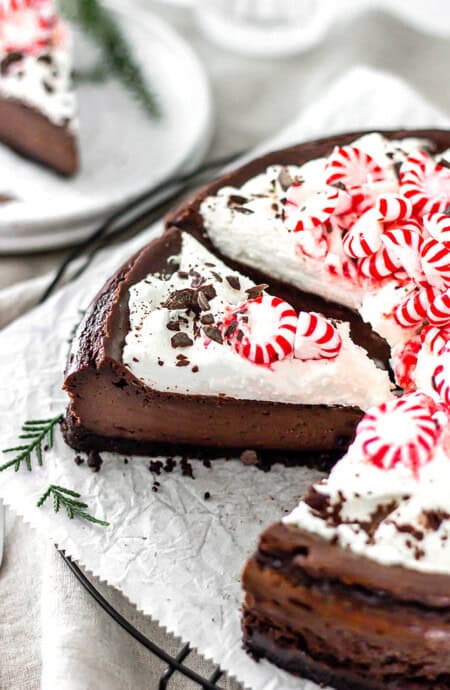
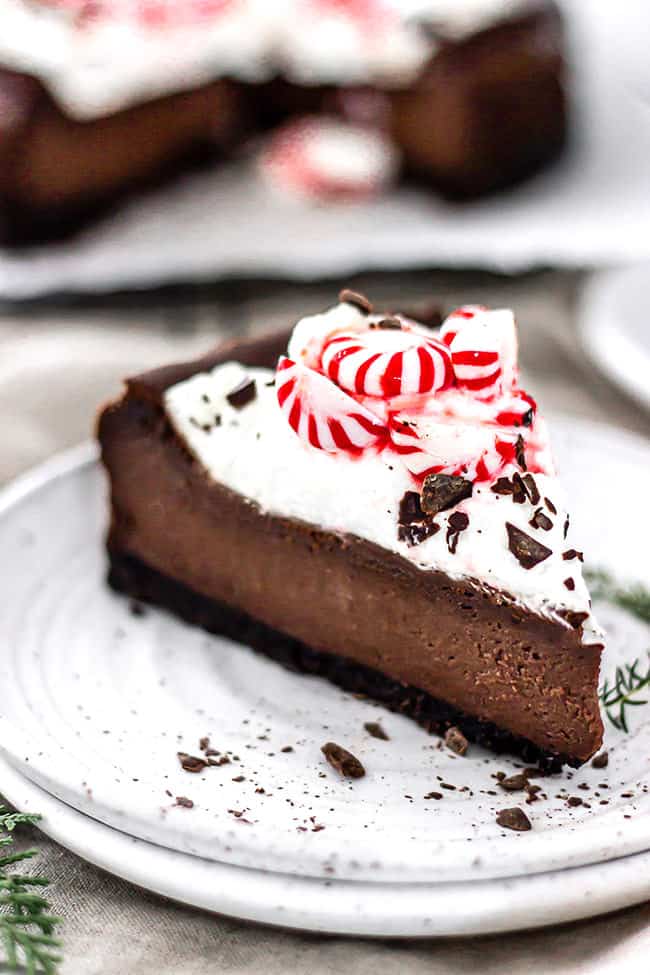
I usually hate peppermint in desserts because it tastes like toothpaste to me. This chocolate peppermint cheesecake recipe changed my mind for real. It’s the perfect balance of chocolate and peppermint and almost tastes refreshing. Plus its just rich and that texture is smooth like butter y’all. I add fresh whipped cream to balance it all out. Now I know cheesecake baking can be super all-consuming but it’s so worth it in the end.
This post may contain affiliate links. Read our disclosure policy.
How to Make a Chocolate Peppermint Cheesecake
1. For the Crust
- Start with mixing the chocolate cookie crumbs and sugar together with melted butter.
- Press into the bottom of your springform pan and bake for 10 minutes then set aside to cool.
2. For the Filling
- Mix cream cheese and sugar on medium until it’s super smooth.
- Add the heavy cream, followed by eggs one at a time.
- Add the sour cream, vanilla extract, peppermint extract, cocoa powder, and flour. Mix until it’s super smooth.
- Pour that batter over your crust. If you want to add a water bath, this is your time.
3. To Bake
- Pop it in the oven and bake for 1 hour. Then, with the oven off, let it chill inside with the door closed for 4 hours.
- Post-oven, ensure it’s chilled before it hits the fridge. If it’s still warm, let it cool on the counter. Overnight in the fridge and it’s ready to eat the next day.
Chocolate Peppermint Cheesecake Recipe
Want to Save This Recipe, Boo?
Ingredients
For The Crust:
- 1 1/2 cups chocolate sandwich cookies crushed
- 3 tbsp granulated sugar
- 5 tbsp unsalted butter melted
For The Cheesecake Filling:
- 4 8 oz packages packages cream cheese room temperature
- 1 1/2 cups granulated sugar
- 3/4 cups heavy cream room temperature
- 4 large eggs room temperature
- 1 cup sour cream room temperature
- 1 1/2 tbsp pure vanilla extract
- 1/2 tsp peppermint extract
- 2/3 cup cocoa powder
- 2 tbsp all-purpose flour
For The Whipped Cream:
- 1 cup heavy whipping cream cold
- 1 tbsp granulated sugar
- 1/4 tsp peppermint extract
- 1 drop red food coloring
For garnish: crushed and whole peppermint
Instructions
- Preheat oven to 350 degrees F (175 degrees C). Thoroughly spray a 9-inch springform pan with non-stick baking spray. If attempting a water bath, make sure your springform pan is securely closed then triple wrap the sides of the pan with foil to prevent any water from seeping into the sides. It is crucial that the pan doesn’t have any openings or water could seep in creating a soggy cheesecake.
For the Crust:
- Whisk together chocolate cookie crumbs and sugar with melted butter.
- Press mixture into the bottom of the springform pan and bake in the oven for 10 minutes.
For the Cheesecake Filling:
- In the KitchenAid® Ceramic Bowl of your Stand Mixer, mix cream cheese and sugar at medium speed until completely blended and smooth.
- Add in heavy cream, and then add in the eggs one at a time, mixing until incorporated.
- Lastly, pour in sour cream, vanilla extract, peppermint extract, cocoa powder and flour and mix until entire batter is smooth, scraping down sides as needed. Carefully pour the batter into the prepared pan. (Optional) Water bath: Place your cheesecake pan inside a larger pan and slowly fill the large pan with boiling water halfway up the sides of the springform pan.
- Bake cheesecake for 1 hour. Turn the oven off and let the cake cool in oven with the door closed for 4 additional hours.
- Remove cheesecake from oven after 4 hours and make sure the cheesecake is completely chilled before placing in the refrigerator (if it is still a bit warm, allow it to cool on the counter before refrigerating), then chill overnight until ready to serve.
For the Whipped Cream:
- Beat heavy cream in the bowl of your KitchenAid® Stand Mixer on high speed until soft peaks form.
- Slowly add in sugar and mint extract and beat until stiff peaks form.
- Pile the whipped cream in the center of the cheesecake.
- Carefully dip a butter knife into the red food coloring and swirl through the pile of whipped cream creating a decorative pattern. Dip back in food coloring as needed.
- Lastly sprinkle crushed peppermint over whipped cream and garnish with any additional peppermint and serve.
Notes
How to Store Leftover Cheesecake
To refrigerate, you can be tightly wrapped (in saran or foil) or place in an airtight container for up to 5 days. To freeze, wrap the slices in saran or foil and place them in a heavy freezer-type plastic bag. A frozen cheesecake will last for up to 3 weeks. If you’re looking to plan ahead, an entire cheesecake can be made, wrapped and frozen for up to 6 weeks. Thaw frozen cheesecake in the refrigerator overnight. If you’re in a hurry, or in need of a sugar-fix, an individual slice can be thawed at room temperature in 30 minutes.Nutrition
Recipe Tips
- Always Use Room Temp Ingredients: We don’t want the batter to have lumps. This will ensure your batter is super smooth. If you’re in a pinch, take your cream cheese out of the foil and heat in the microwave for 10-15 seconds. Anything but cold cream cheese, please!
- Don’t Overmix Your Batter: Both over-mixing and mixing on too high of a speed can cause cracks and craters during the baking process.
- Let Your Cheesecake Cool Gradually: After the allotted baking time, let your cheesecake to sit in the oven for an additional 4 hours with the oven off. Then, set your cheesecake out on the counter until completely cooled. Transfer to the fridge to cool overnight.
Want to Save This Recipe, Boo?
More Chocolate Peppermint Recipes
For More Cheesecakes
If you love other cheesecake recipes, definitely try my Mint Chocolate Cake, Quadruple Chocolate Cheesecake, New York Cheesecake, Sweet Potato Cheesecake and my Strawberry Cheesecake for a no bake twist!!
Photos by Eat More Cake By Candice
 pinterest
Oh my gosh, look at all that lovely peppermint in this cheesecake!
That’s my fave part too!
I could do some damage to this. Lovely.
Oh yeah, real damage!
This Cheesecake is just gorgeous Jocelyn!! Pinning and heading over for the recipe now!! 🙂
Awww you are awesome, thanks Renee!
I had to pin this one. Chocolate and peppermint go SO well together. AND I am a cheesecake fiend.
Just something about it—-
I totally know the feeling about cheesecake. Thank you for the pin!
What a gorgeous cheesecake! The texture really does look incredible and it’s just so festive and perfect for the holidays! Popping over to KitchenAid now to get the details!
Awww thanks boo!
This cheesecake is BEAUTIFUL! Love that pile of peppermint on top, and I loooove minty cheesecakes. So yummy! Pinned 🙂
Minty cheesecakes taste amazing! Thank you for the pin doll!
Peppermint cheesecake is my favorite this time of year! Love this!
It’s been so long since I made a cheesecake.. I definitely need to get my act together and check this one out! LOVE chocolate and peppermint!
That is just beautiful! It would make a perfect Christmas dessert centerpiece! I wouldn’t want anyone to cut it though. : )
Girl, you sure know your way into my heart! This cheesecake is BONKERS amazing 🙂