
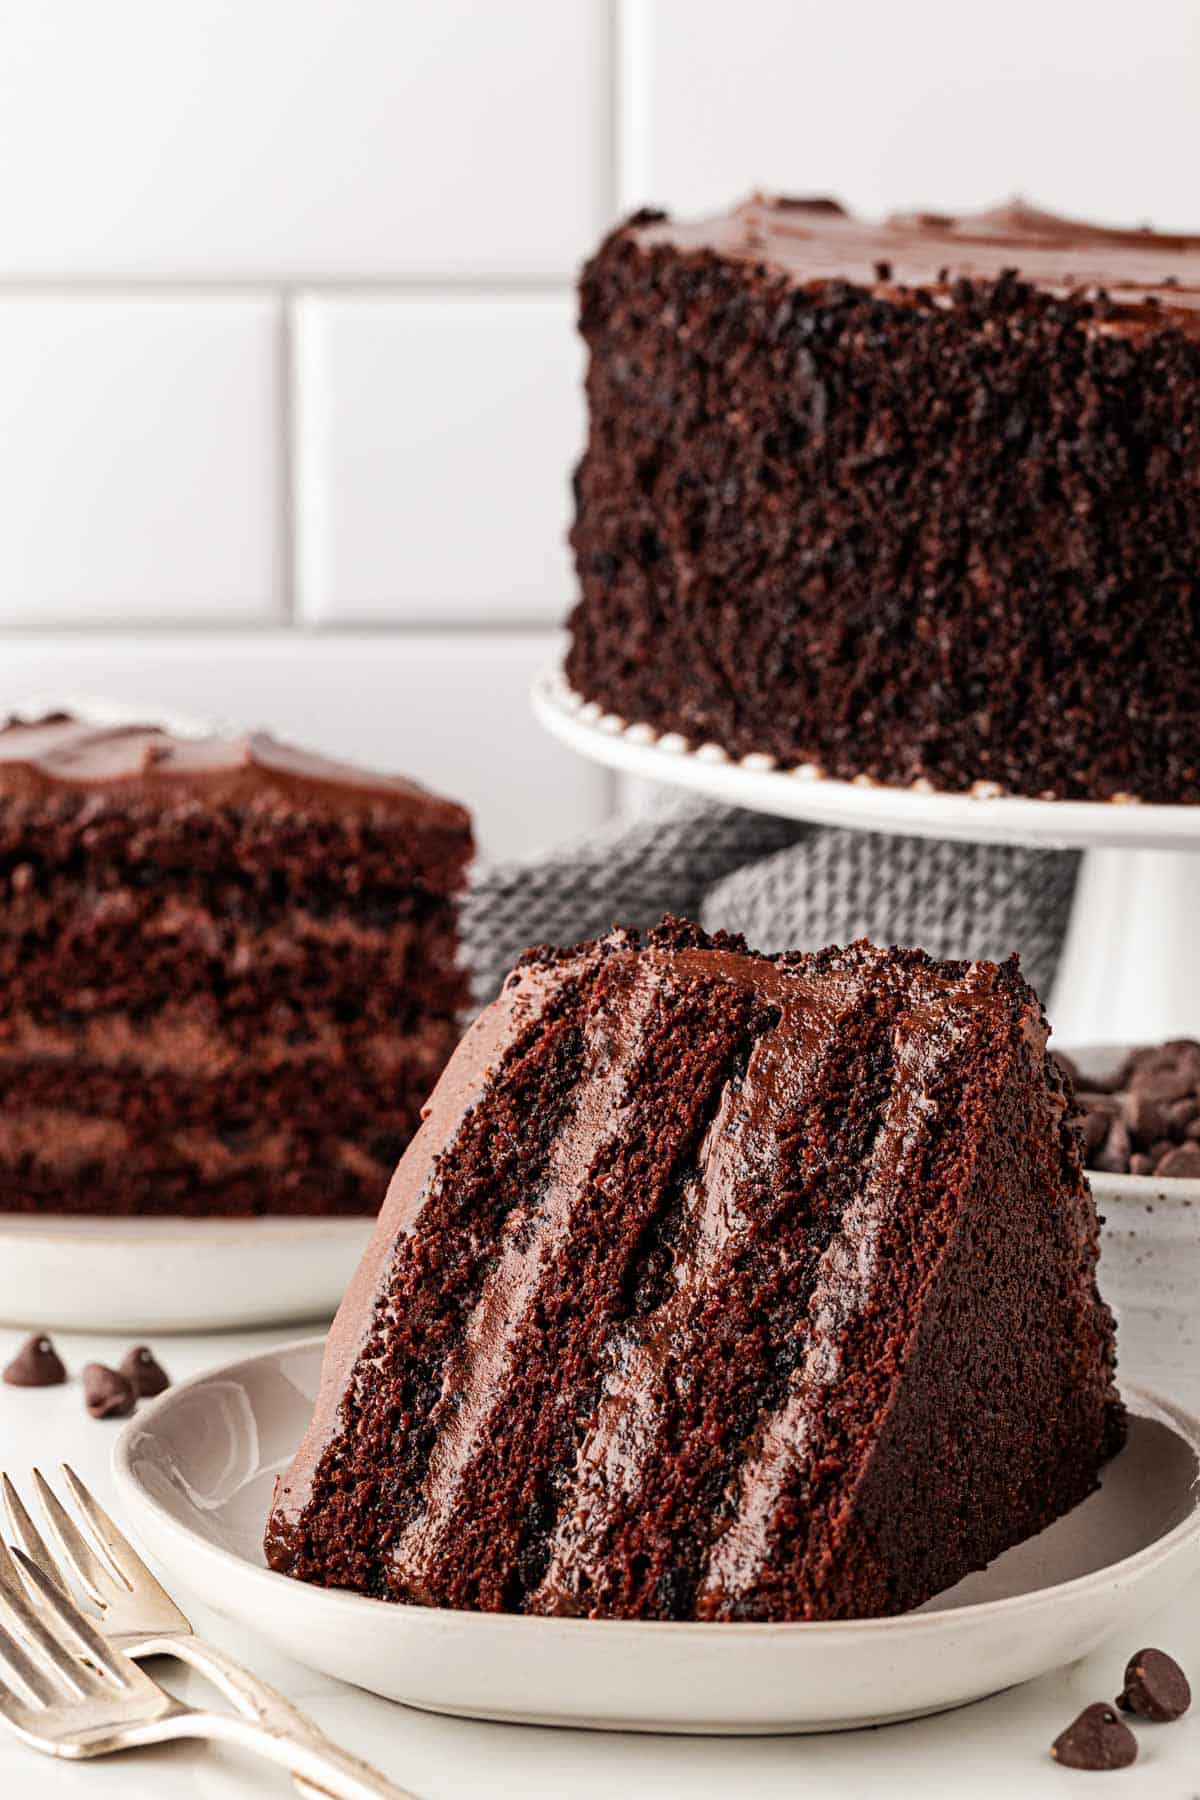
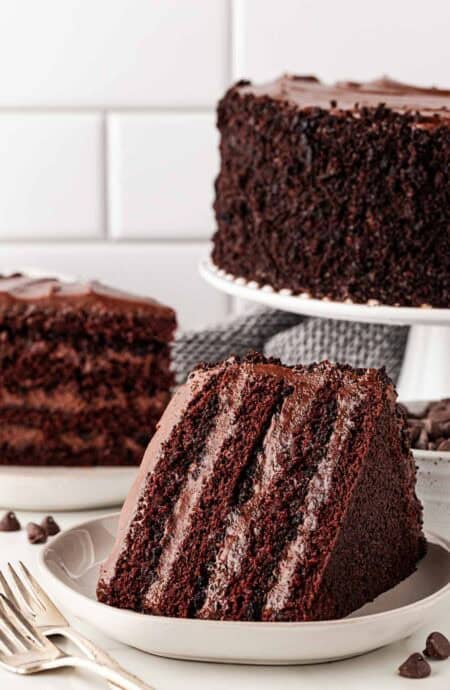
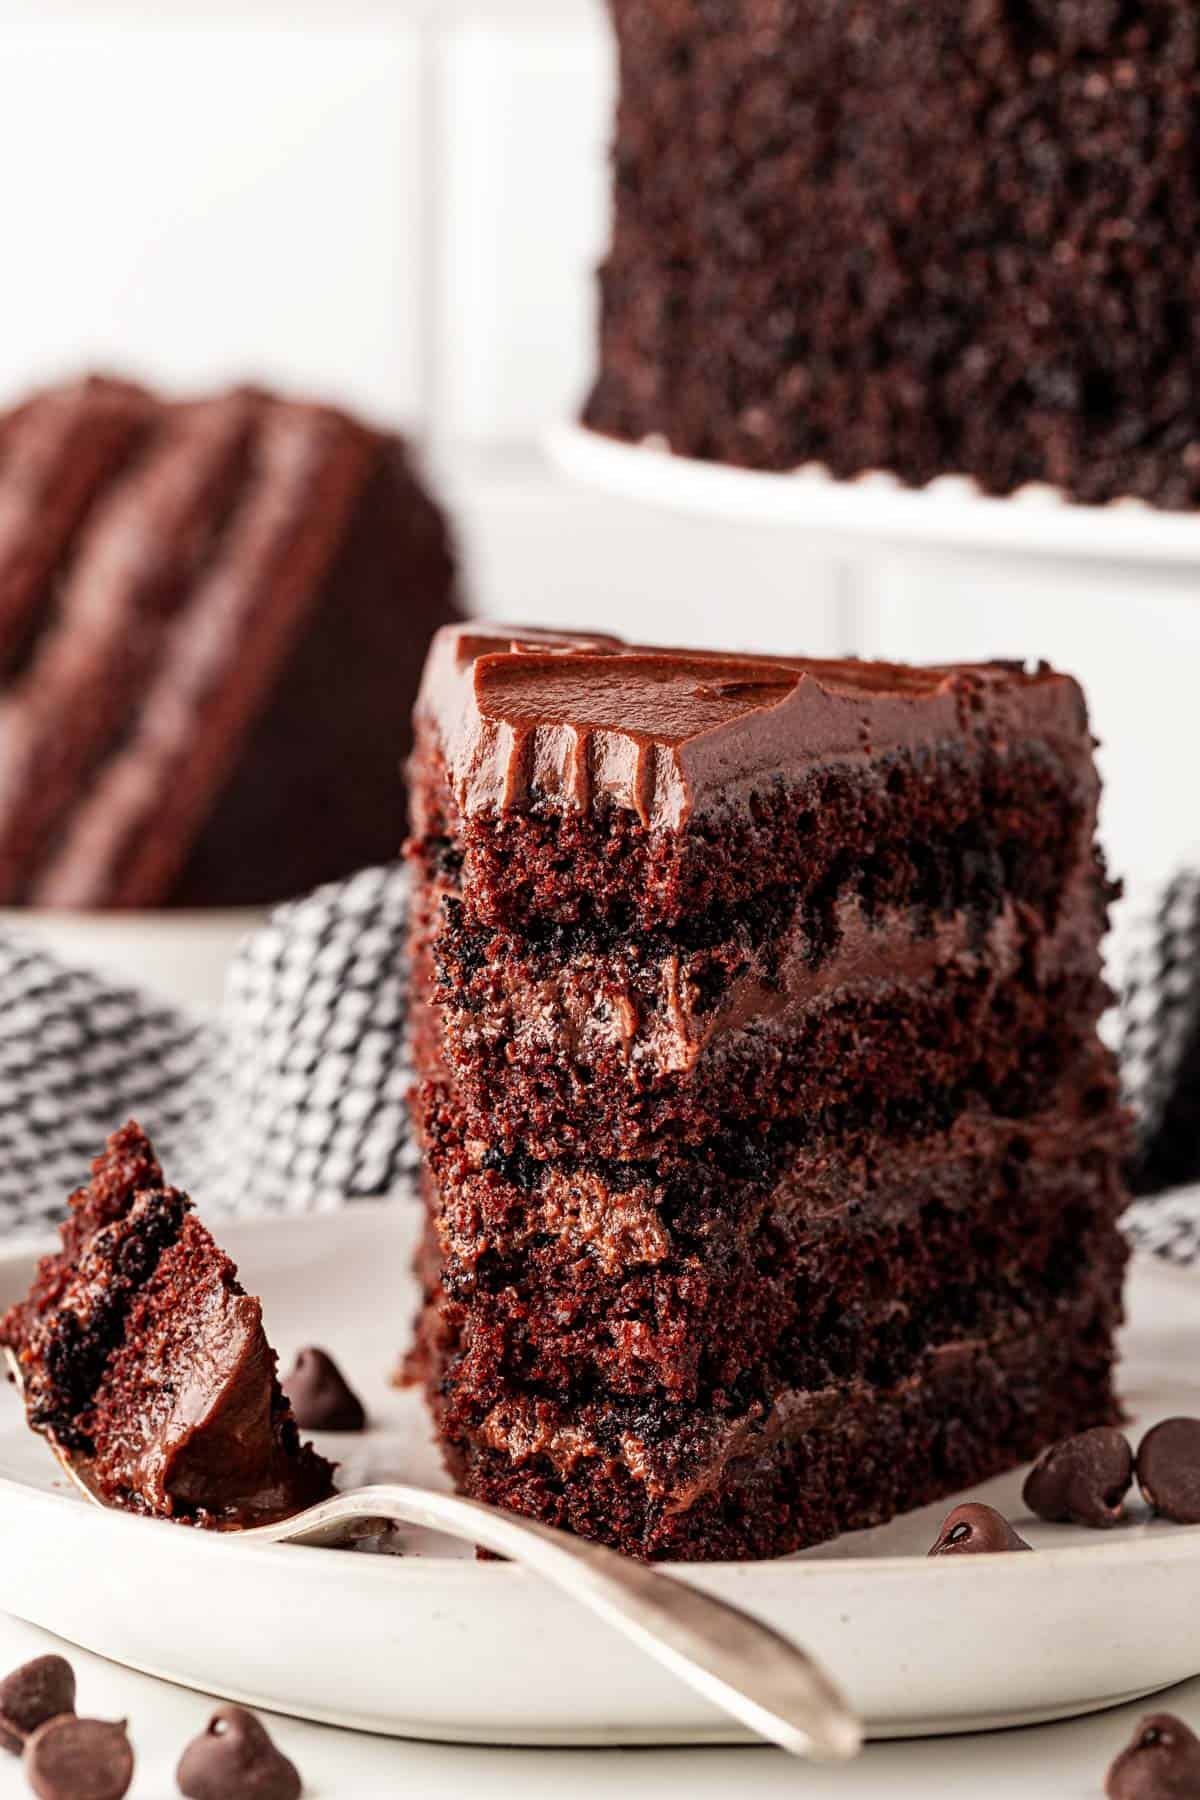
The first time I had a Brooklyn Blackout Cake, I had to sit down and take a moment. It was that good, boos. Just me, a fork, and layers of the richest chocolate cake I’d ever tasted. I knew right then I had to make my own version at home, something bold, messy, and worth every crumb. This Brooklyn Blackout Cake doesn’t hold back. It’s dark, fudgy, and smothered in CHOCOLATE chocolate frosting with those signature crumbs on top. It’s the kind of cake that makes you forget your table manners for a minute. It’s just pure, old-school, chocolate-on-chocolate love the way it’s meant to be.
This post may contain affiliate links. Read our disclosure policy.
Video Tutorial
How to make a Brooklyn Blackout Cake
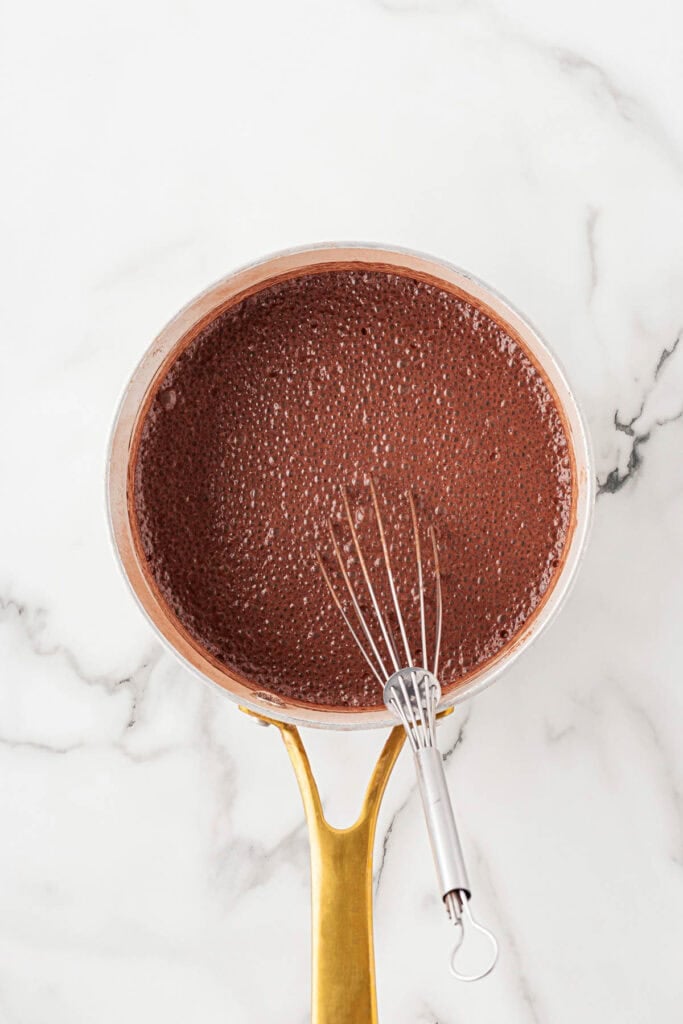
Step 1: In a medium, heavy-bottomed saucepan, sift together the sugar, flour, and cocoa powder. Whisk in the salt and milk. Heat over medium heat, stirring continuously.
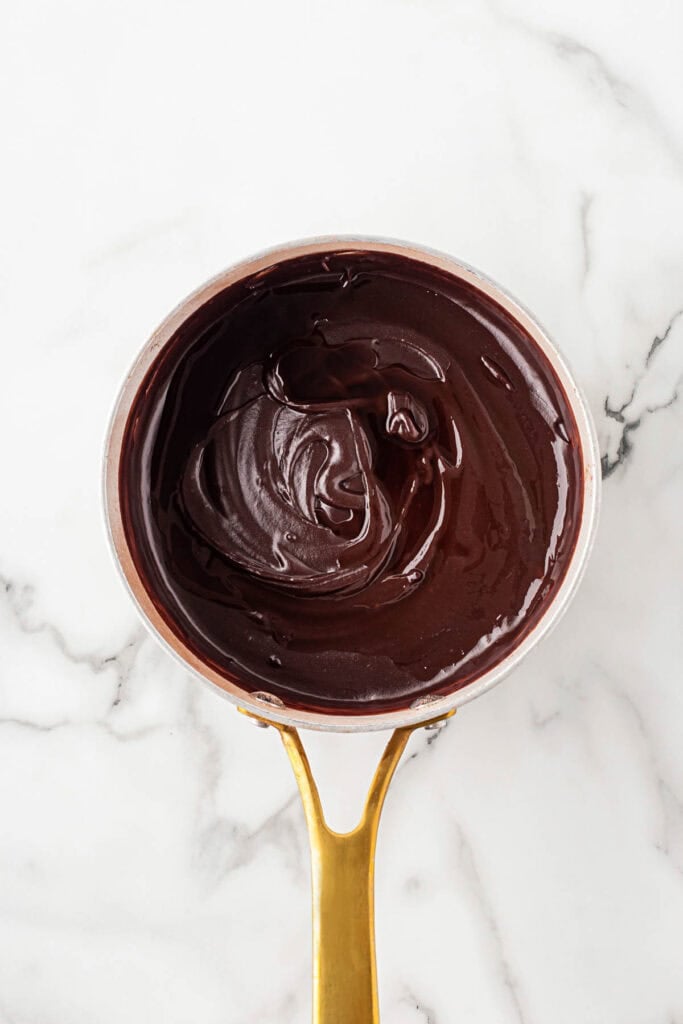
Step 2: Once thickened, remove the mixture from the stove and cool.
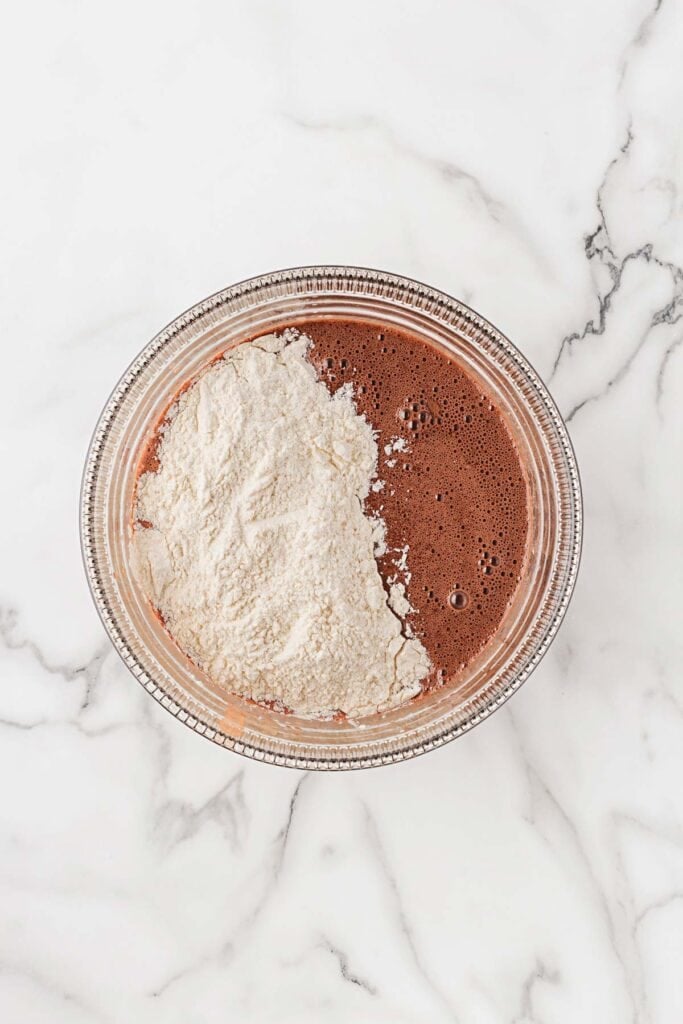
Step 3: Add the dry chocolate cake ingredients to the wet ingredients and mix to combine.
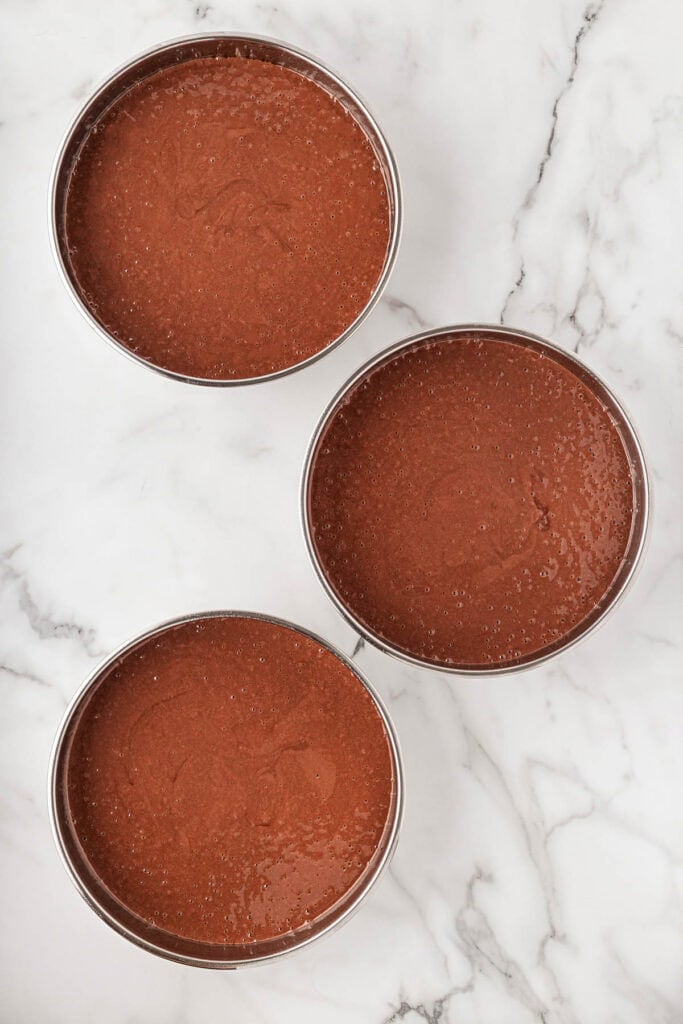
Step 4: Fill 3 9-inch cake pans with batter and bake.
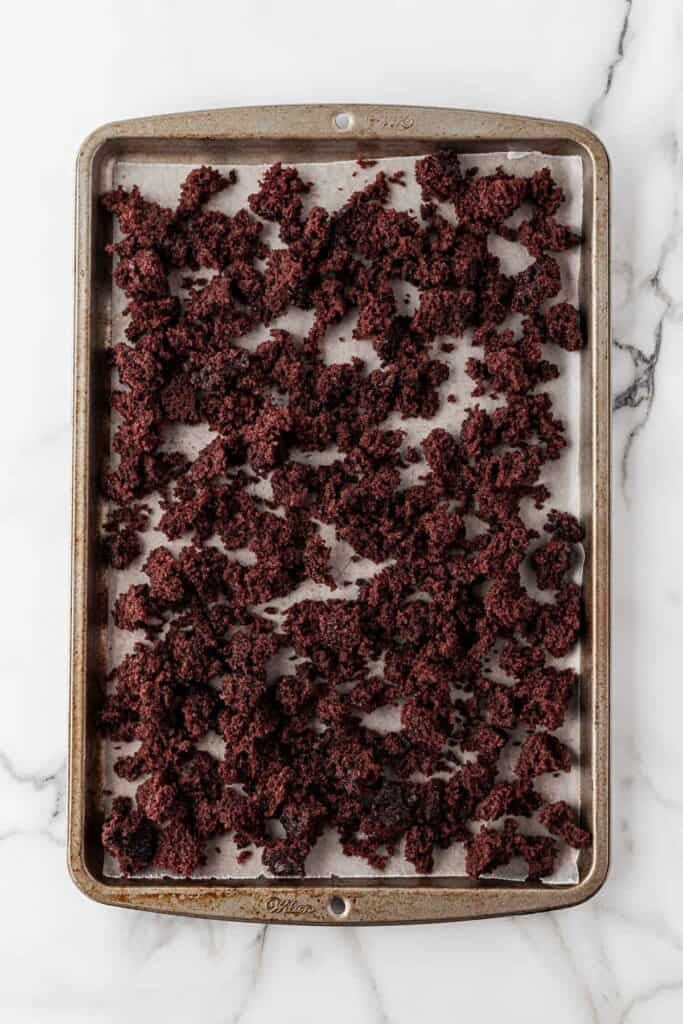
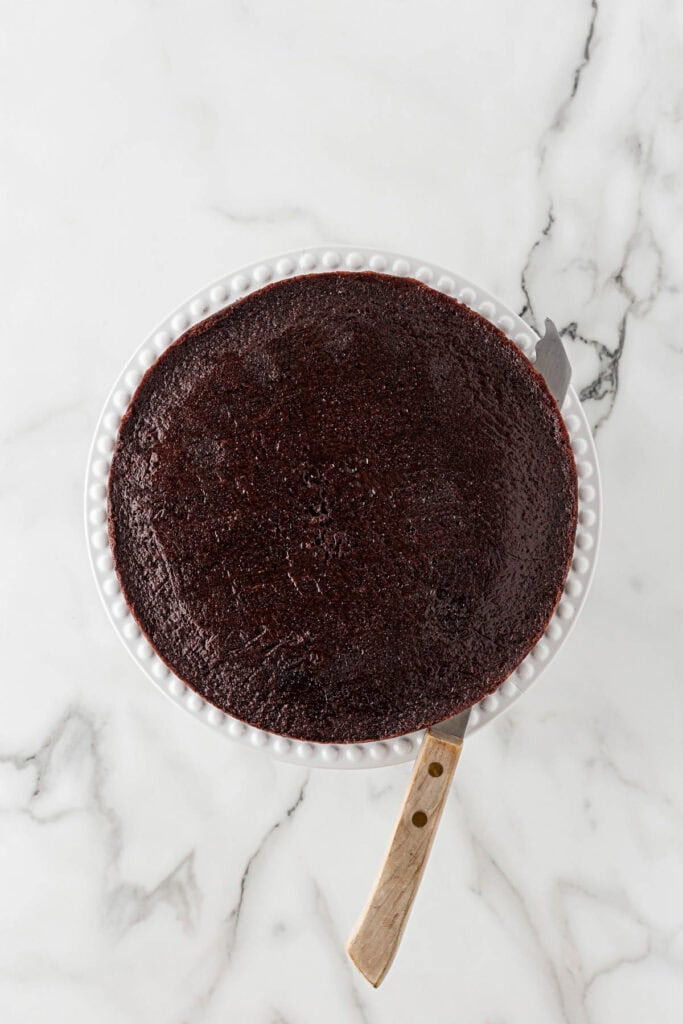
Step 5: Take one of the cake layers and, using your hands, break it into small, walnut-sized pieces. Spread on a parchment-lined baking sheet in an even layer and bake.
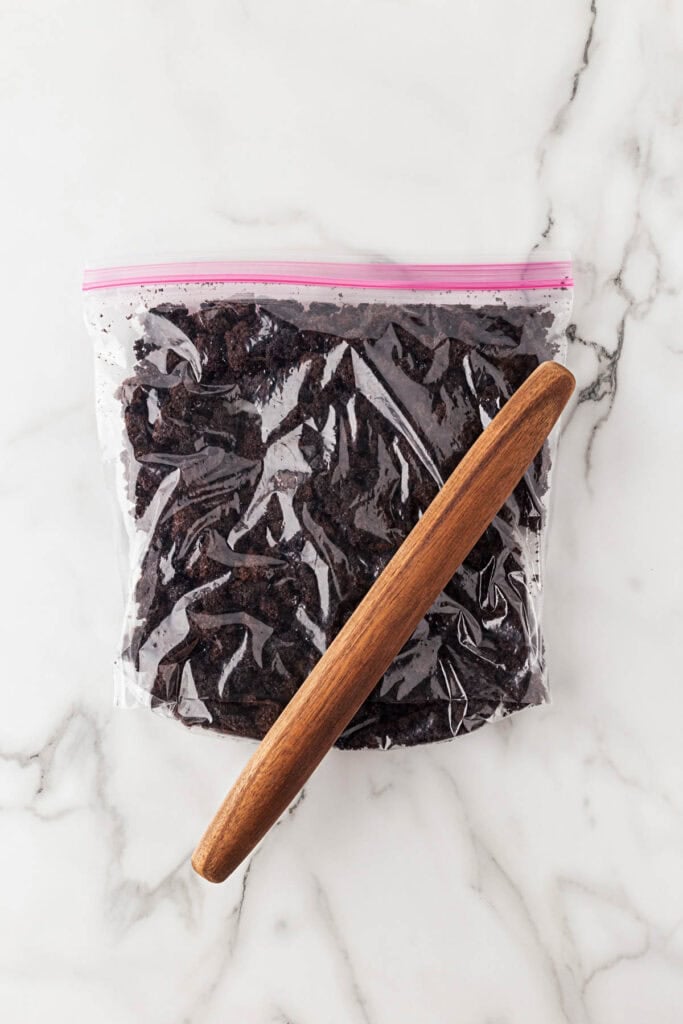
Step 6: Once cool, place in a large zip-top bag and crush into crumbs with a rolling pin and place in a large bowl.
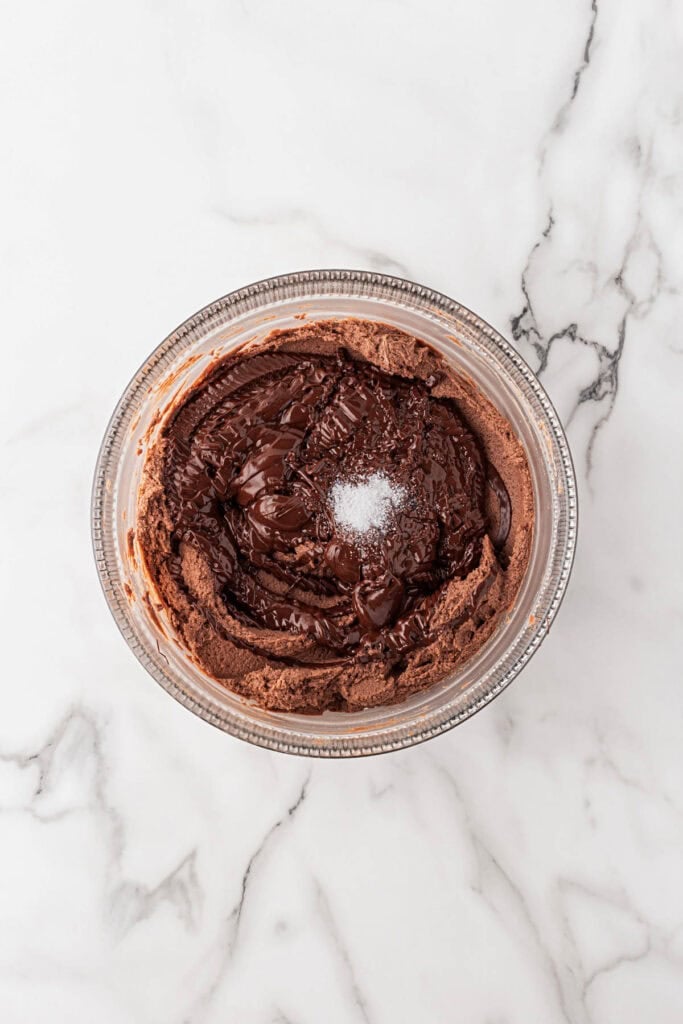
Step 7: Make the frosting in the bowl of a stand mixer with the pudding mixture in three intervals. Reduce the speed and slowly pour in the cooled chocolate and salt. Increase the speed and mix.
Step 8: Cut each of the remaining cake rounds in half horizontally with a serrated knife.
Want to Save This Recipe, Boo?
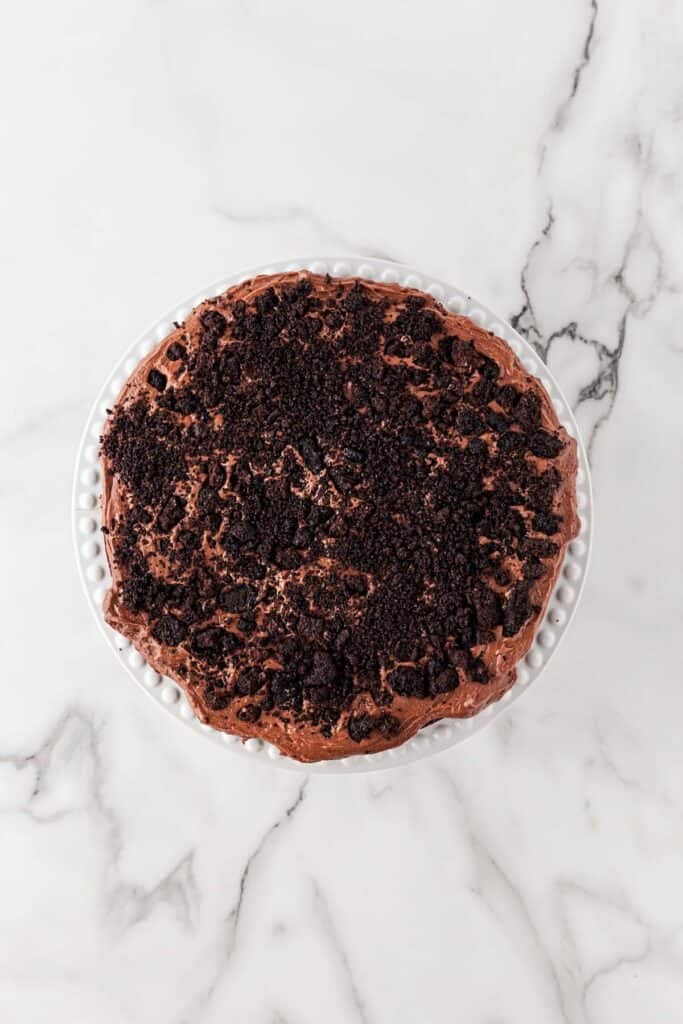
Step 9: Place the bottom layer on your cake stand. Place some of the frosting on top and spread evenly just over the edges of the cake. Sprinkle on a layer of cake crumbs and gently press into the frosting. Repeat with the next two layers of cake, frosting, and cake crumbs.
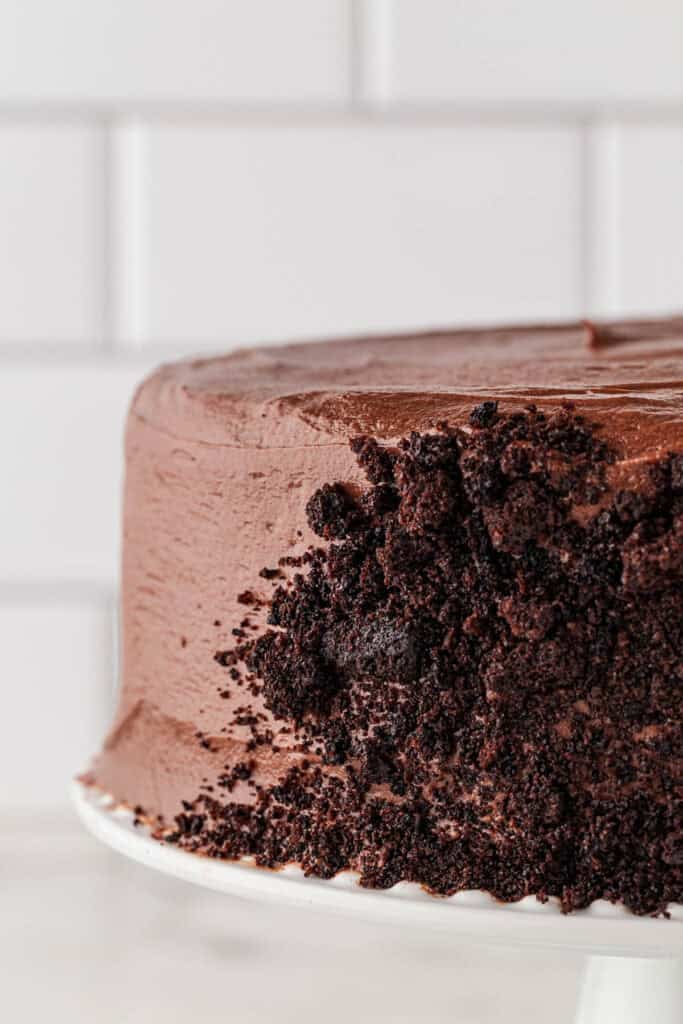
Step 10: Frost the cake covering the top and sides with a crumb coating. Chill in the refrigerator. Remove the cake from the refrigerator and coat the top and sides with the remaining frosting, and smooth it. Hold the cake stand/plate in one hand and with the other, take a handful of crumbs and gently press them into the side of the cake. Continue around the entire side of the cake until evenly covered.
Brooklyn Blackout Cake
Want to Save This Recipe, Boo?
Equipment
- Medium Sauce Pan
Ingredients
For the Cake
- 2 large eggs room temperature
- 2 cups granulated sugar
- ½ cup Dutch-process cocoa powder*
- 1 teaspoon instant coffee powder
- 1 cup hot water
- 2 ½ cups all-purpose flour
- 2 teaspoons baking soda
- 1 teaspoon baking powder
- ½ teaspoon kosher salt
- 1 cup vegetable oil
- 1 cup buttermilk room temperature
- 1 tablespoon vanilla extract
For the Frosting
- 1 1/3 cup granulated sugar
- 2/3 cup all-purpose flour
- 6 tablespoons Dutch-process cocoa powder
- 1 ½ teaspoon kosher salt divided
- 2 cups milk
- 1 tablespoon vanilla extract
- 1 pound salted butter softened
- 1 ½ cups bittersweet chocolate chips
Instructions
For Frosting
- In a medium, heavy-bottomed saucepan, sift together the sugar, flour, and cocoa powder. Whisk in 1 teaspoon salt and milk.
- Heat over medium heat, stirring continuously. The mixture will begin to thicken after 8-10 minutes. Continue cooking and whisking for an additional 2 minutes, then remove from the heat and stir in the vanilla extract. Scoop the mixture into a medium bowl and using a silicone spatula, stir occasionally as it cools to room temperature, about 30 minutes. Then place plastic wrap directly on the surface of the mixture and place in the refrigerator to completely cool and set for 2 hours.
For Chocolate Cake
- Meanwhile, preheat the oven to 350°F and place racks on the two middle positions. Spray the bottom and sides 3 9-inch rounds with nonstick baking spray.
- Add eggs and sugar to the bowl of your stand mixer and beat on high speed for 2-3 minutes.
- While the mixture beats, add cocoa powder and instant coffee to the hot water in a separate bowl. Slowly add this mixture to the eggs and sugar.
- Sift flour, baking soda, baking powder, and salt in a small bowl. Reduce the speed of the mixer to low then add in the dry ingredients in two intervals. Next, add the vegetable oil, buttermilk, and vanilla extract and beat until just combined. The batter will be sort of thin, but this is normal.
- Evenly divide the cake batter into all three pans and bake for 22-25 minutes, or until an inserted toothpick comes out clean. Halfway through baking rotate the pans from front to back and revolve from top to bottom.
- Remove the cakes from the oven and allow to rest for 10 minutes before removing from the pans and placing on a wire rack to cool completely, about 30 minutes.
For Cake Crumbs
- Take one of the cake layers and, using your hands, break it into small, walnut-sized pieces. Spread on a parchment-lined baking sheet in an even layer. Bake at 350°F for 30-35 minutes, stirring halfway through. Bake until the cake pieces are dried out.
- Remove from the oven and let cool fully, about 15 minutes.
- Once cool, place in a large zip-top bag and crush into crumbs with a rolling pin and place in a large bowl.
To Finish Frosting and Assemble
- After the pudding mixture has cooled, melt the chocolate in a medium microwave-safe bowl and heat on low for 3 minutes, stirring at 20 second intervals until completely melted. Let sit for 5 minutes to cool.
- Add the softened butter to the bowl of your stand mixer fitted with the whisk attachment and whip the butter for about 1 minute, until light and smooth.
- Add the pudding mixture in three intervals, mixing on medium and stopping to scrape down the sides and especially the bottom of the bowl to ensure everything is incorporated. Reduce the speed and slowly pour in the cooled chocolate and ½ teaspoon salt. Increase the speed to high and mix for an additional minute, scraping down the sides and bottom of the bowl. The frosting should look rich and have a dull sheen.
- Cut each of the remaining cake rounds in half horizontally with a serrated knife. Place the bottom layer on your cake stand. Place some of the frosting on top and spread evenly just over the edges of the cake. Sprinkle on a layer of cake crumbs and gently press into the frosting. Repeat with the next two layers of cake, frosting, and cake crumbs.
- Finally, place the last layer of cake on top, then cover the top and sides of the cake with a very thin layer of frosting and smooth it to make it even. This will be your crumb coating to make it easier for the final layer of frosting. Chill in the refrigerator for 30 minutes to allow the layers and frosting to set. Remove the cake from the refrigerator and coat the top and sides with the remaining frosting and smooth it.
- To garnish the cake, hold the cake stand/plate in one hand and with the other, take a handful of crumbs and gently press them into the side of the cake. Continue around the entire side of the cake until evenly covered. Brush off any excess cake crumbs into the bowl below.
- Slice and serve immediately.
Notes
- It is important to use Dutch-process cocoa powder here. It lends a deeper chocolatey flavor over natural cocoa. My favorite brands are Ghirardelli or Droste.
- Parts of this cake may be made in advance; however, the frosting is best made the same day as you plan to serve the cake.
- To make the cake ahead, follow the instructions and once the cake is fully cooled, wrap it well in plastic wrap and store at room temperature for up to 2 days.
- To make the cake crumbs ahead, make per the instructions, then once completely cooled, place in a zip-top bag, press out any excess air, and store at room temperature for up to 1 day or in the freezer for up to 1 month. They make a great topping for ice cream or yogurt!
Nutrition
Recipe Tips
- Use Dutch-process cocoa; it matters. Natural cocoa will give you a lighter color and sharper flavor, but Dutch-process cocoa is what gives this cake that deep, rich, almost brownie-like taste. Ghirardelli or Droste are both great choices.
- Don’t skip the coffee. You won’t taste it, but that little bit of instant coffee makes the chocolate flavor pop. It’s the secret to that bold, bakery-style richness.
- Keep the batter thin. it’s supposed to be that way. Don’t panic when your cake batter looks pourable instead of thick. That’s what makes the layers super tender and moist once baked.
- Cool everything completely before frosting. This frosting is part pudding, part buttercream and it’s worth the wait. If you try to frost while the cake or pudding base is even slightly warm, it’ll slide right off. Chill both, then whip it together for that silky, spreadable texture.
- Make the cake crumbs, they’re not just decoration. Those chocolate crumbs on the outside aren’t for show. They add texture and help seal in the frosting, keeping the cake moist longer. Plus, it’s fun to get a little messy pressing them on the sides.

Recipe Help
Keep any leftover slices covered in the fridge for up to 4 days. The cake actually gets more flavorful after sitting a bit, so don’t be afraid to enjoy it chilled.
You sure can. Freeze unfrosted layers for up to 2 months — just wrap them well in plastic and foil. Thaw them in the fridge overnight before frosting. You can also freeze individual frosted slices; just let them thaw at room temperature before serving.
Press them on right after you frost the cake while the frosting is still soft. I like to hold the cake in one hand and gently pat the crumbs on with the other it’s a little messy, but that’s part of the fun!
 pinterest
Very delicious, easy to follow directions
So glad you enjoyed it!
I made the cake everyone enjoyed i even got a marriage proposal I was asked to make one for a friend dad! The chocolate frosting was Devine I’m never buying store made chocolate frosting i have photos I wanted to share
How can I share them
Okayyy a marriage proposal?! I love it! that cake clearly did what it came to do.
I’m so glad everyone enjoyed it, especially that chocolate frosting. Once you go homemade, there’s no going back. I’d love to see the photos! You can share them right in the Facebook group just make a post and add them there. I can’t wait to see how it turned out!
The cake is moist, light and tasteful. My first homemade chocolate cake. Thank you
You’re so welcome! Glad you like it!
Delish
Thanks, doll!
Just made this! Simply AMAZING!
So glad you liked it!
I give it an A++ moist and delicious chocolate lovers dream
Thank you so much! I’m thrilled you loved it! It really is a chocolate lover’s dream come true.