
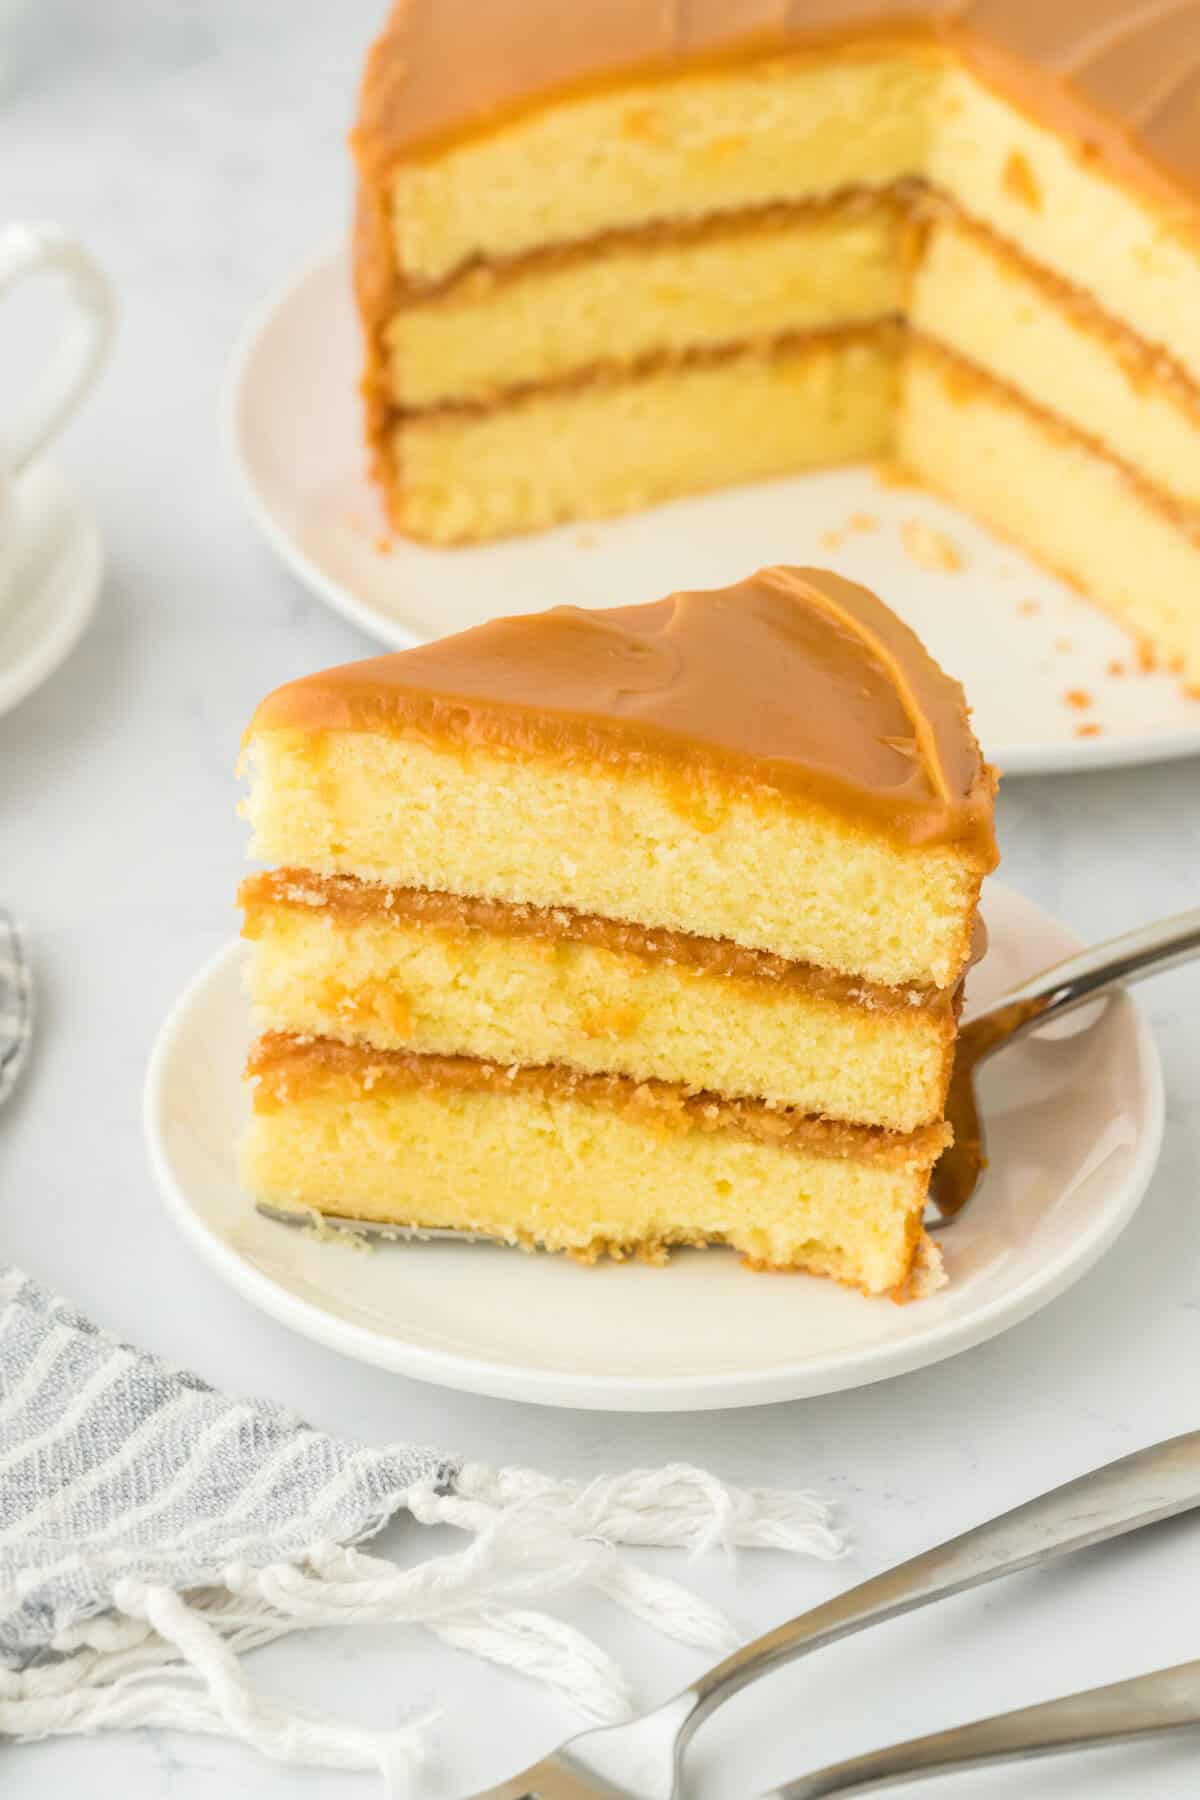
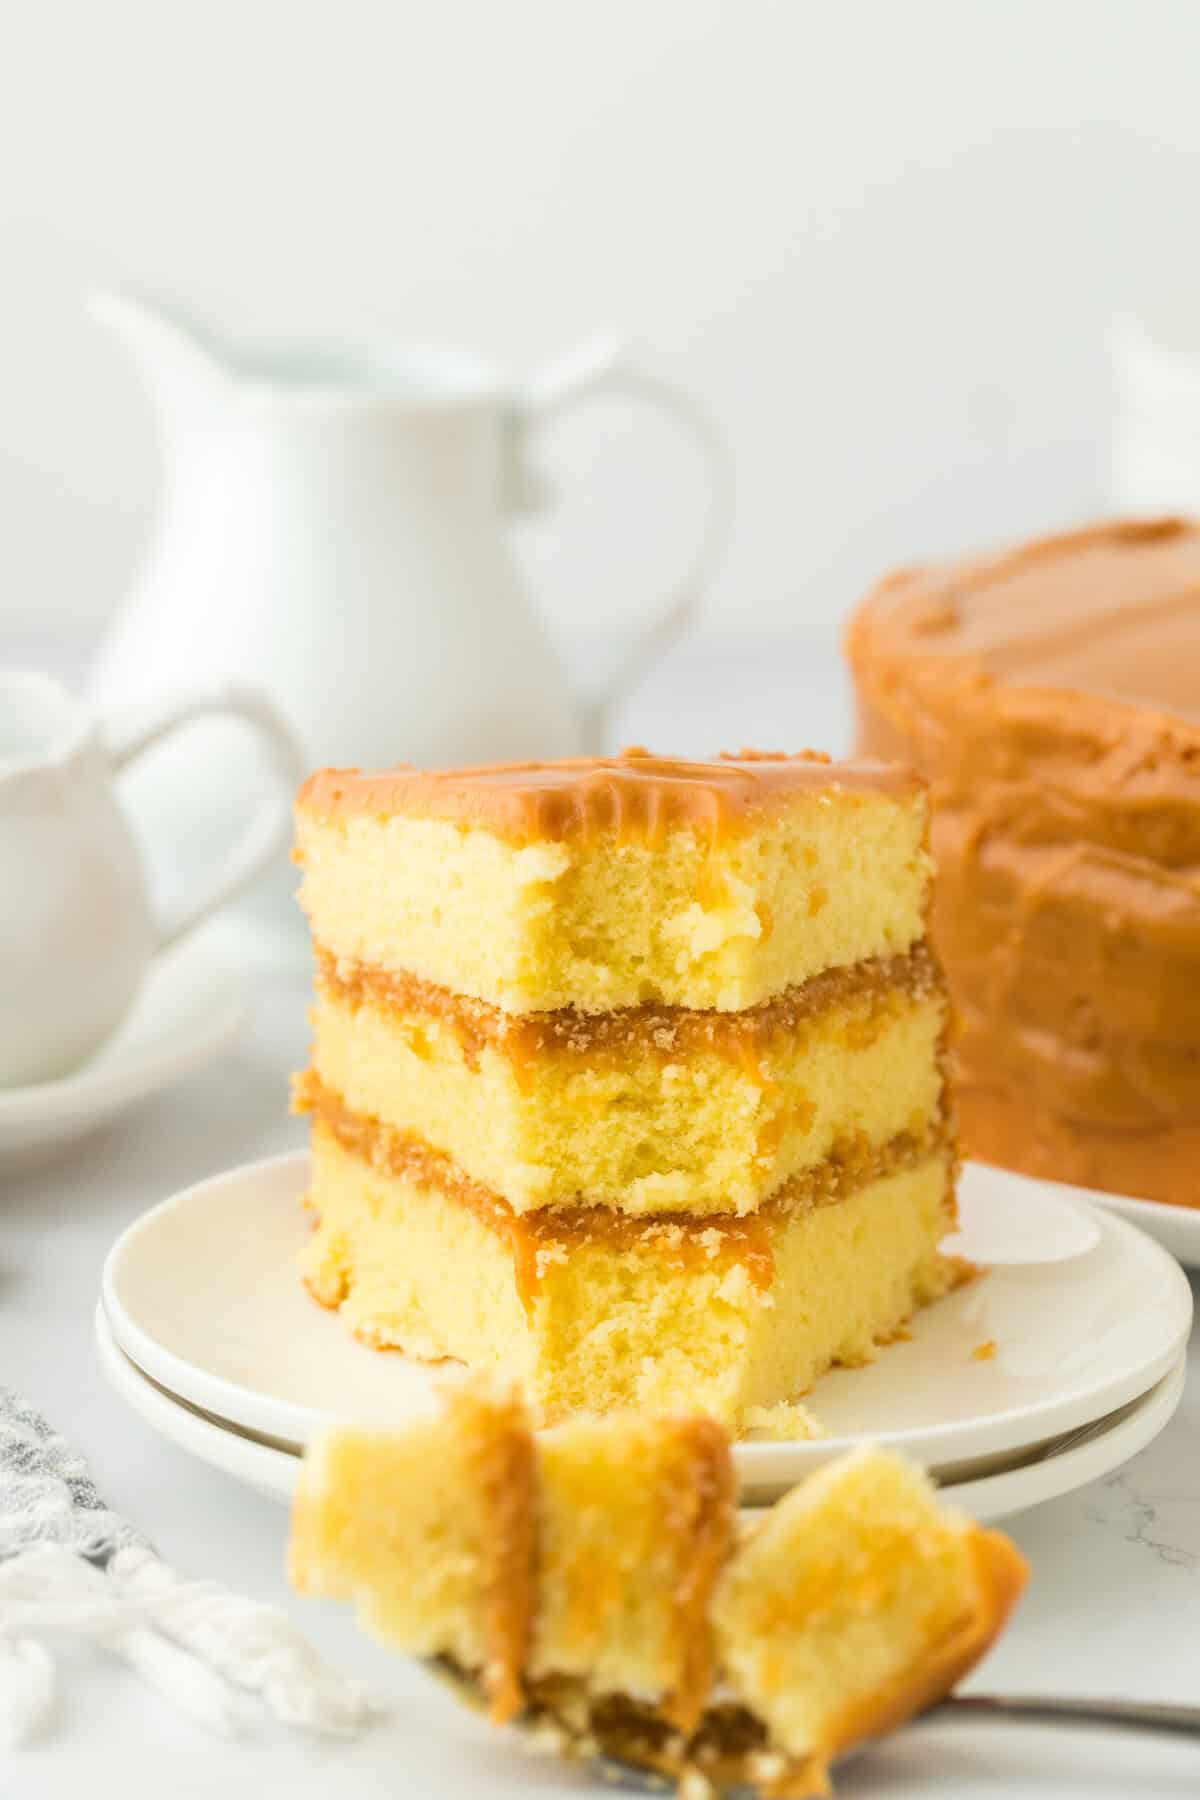
There’s a reason why my real deal Caramel Cake recipe has been the number one recipe online for over 10 years. It’s legit the best, and here’s why! It’s got a moist buttery yellow cake that’s coated in the ultimate caramel icing from my Mississippi bred Aunt Beverly who handed it down to me. The icing is cooked slowly over the stove until it reaches the perfect texture unlike other recipes that take a shortcut sacrificing flavor. This is about as authentic of a recipe as you will find. I’ve tested and retested it until it was absolute perfection. They don’t call it the real deal for nothin!
This post may contain affiliate links. Read our disclosure policy.
Video Tutorial
How to Make Caramel Cake
Mix the Cake Batter
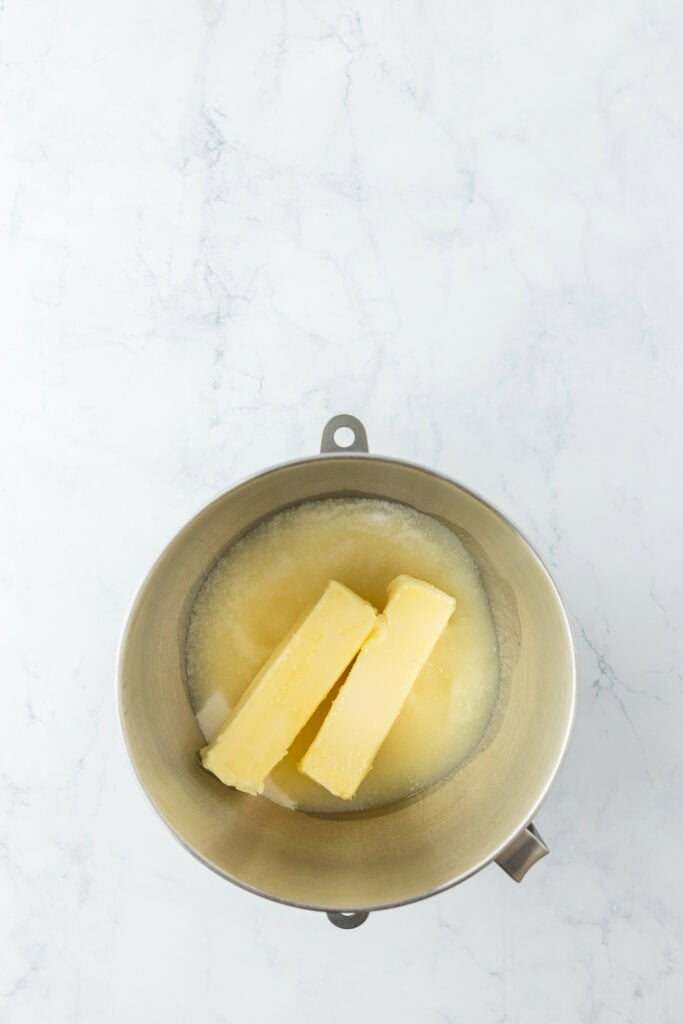
Step 1: Mix the butter, oil, and sugar on high until good and mixed up. We are looking for nice, light and fluffy vibes so let the mixer go for about 4-5 minutes.
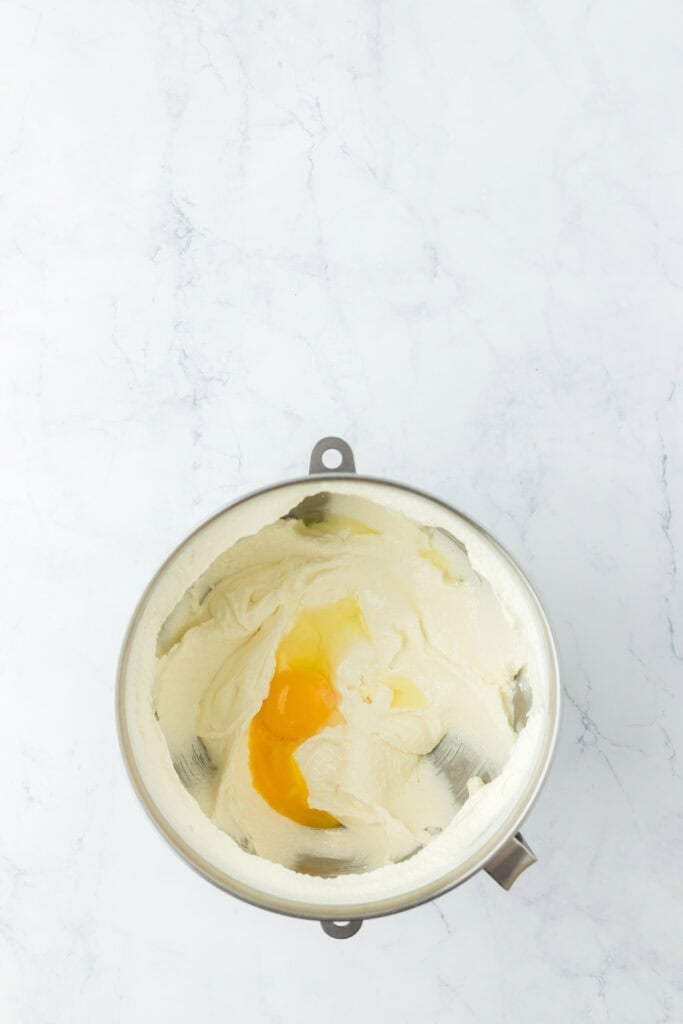
Step 2: Turn the mixer to medium speed and mix in the eggs and egg yolks one at a time until they are well incorporated.
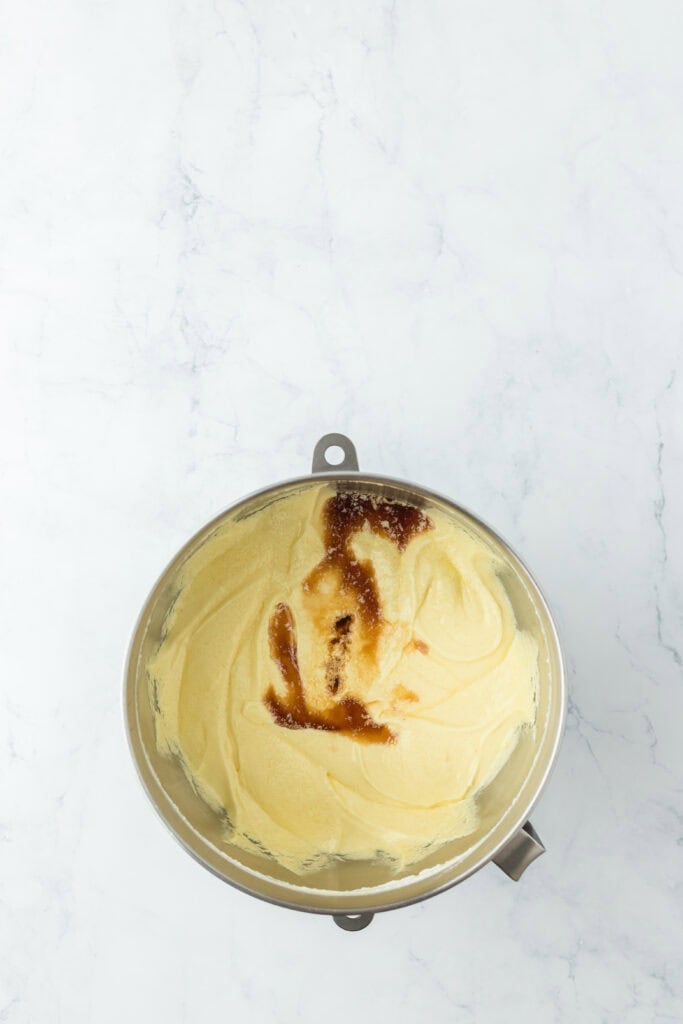
Step 3: Next, toss in the vanilla extract and mix again.
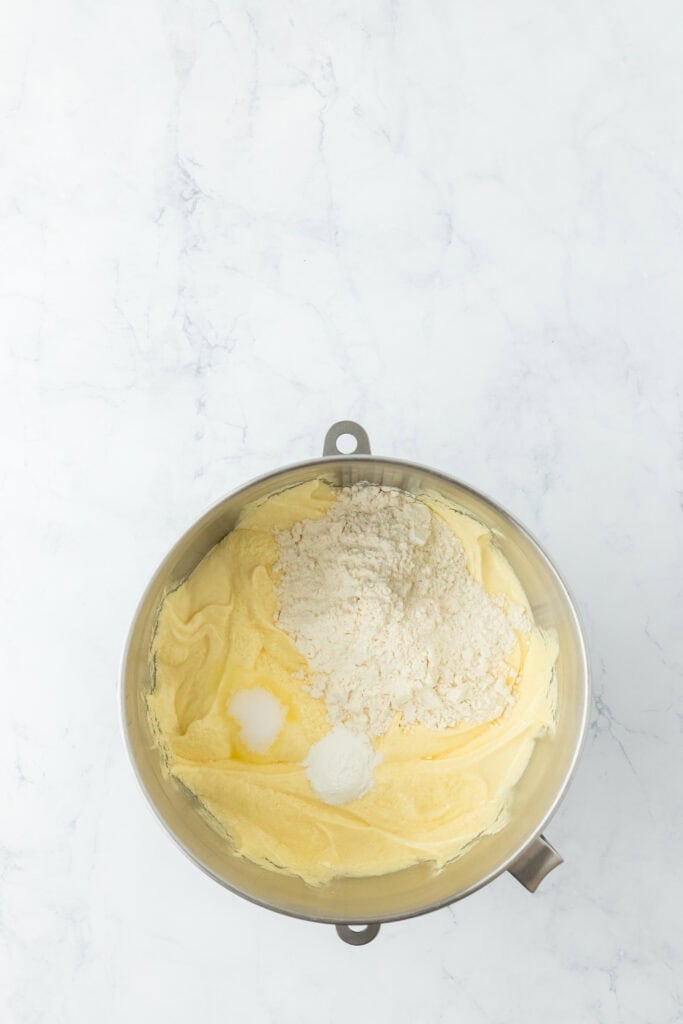
Step 4: Sift the cake flour, baking powder, salt and baking soda into a medium sized bowl then slow the mixer to slow speed.
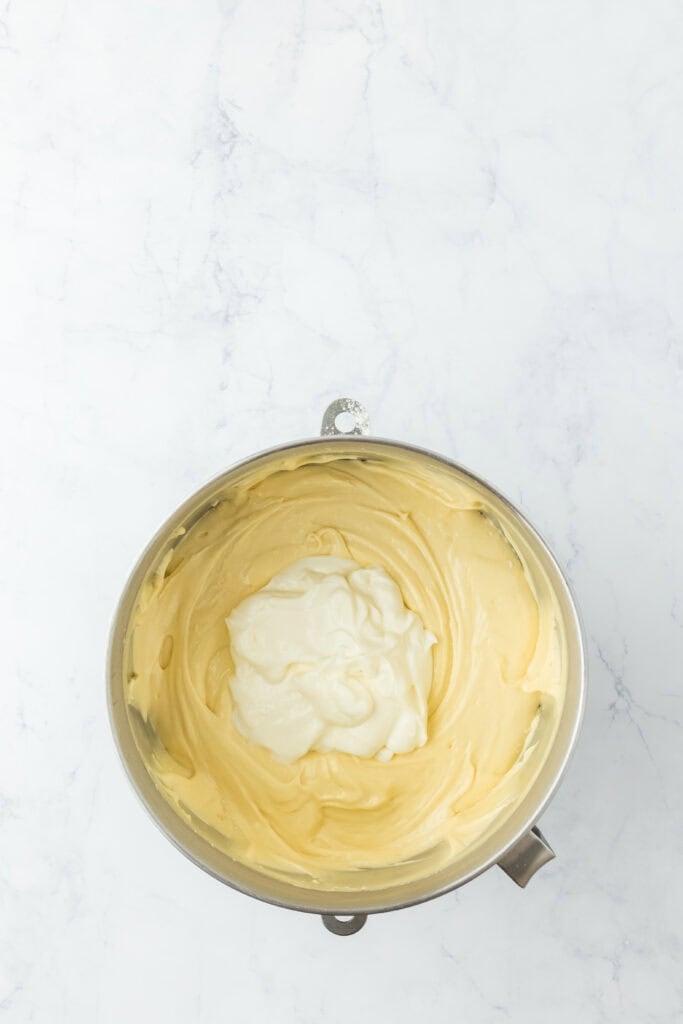
Step 5: Alternate adding in the dry ingredients with the sour cream and heavy cream then finally end with the rest of the dry ingredients.
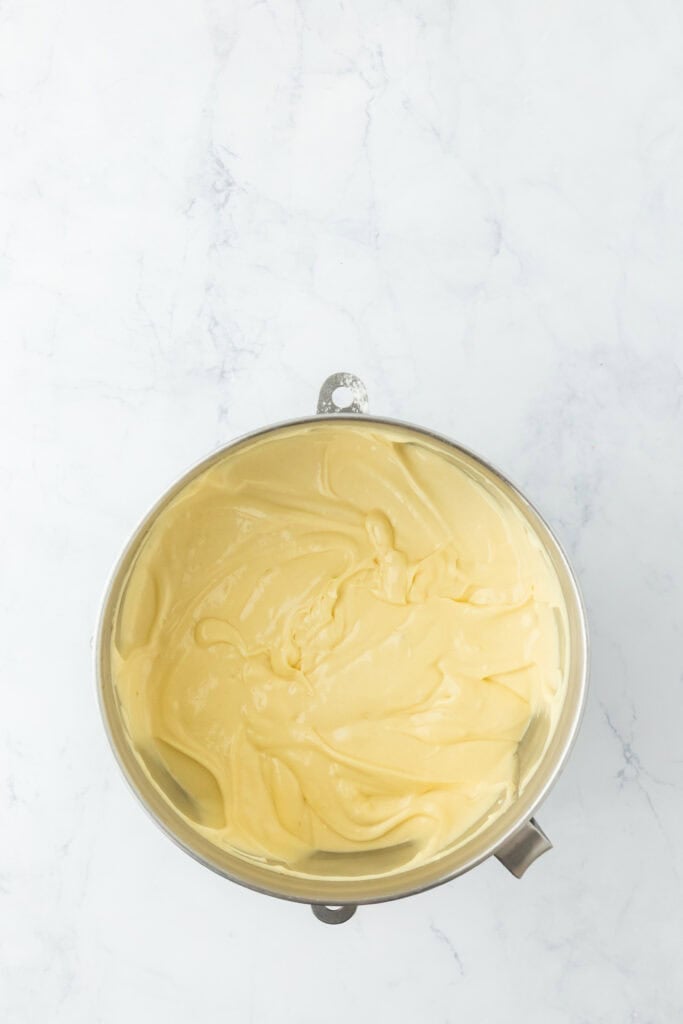
Step 6: At the end of mixing, the batter should be silky and super smooth.
PRO TIP: Don’t overmix. Once you begin adding in the dry ingredients, it’s time to relax boos. We don’t want to overact the gluten and create a tough cake texture.
Time to Bake
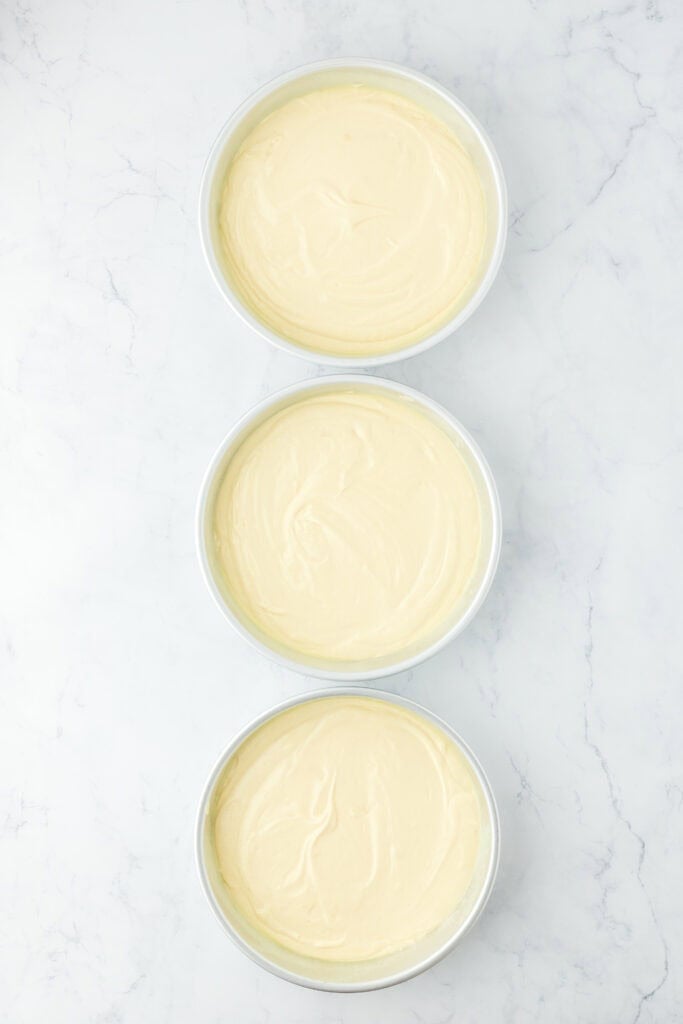
Step 7: Evenly pour batter into the greased up parchment lined cake pans and bake in the oven until fully baked, about 23-30 minutes.
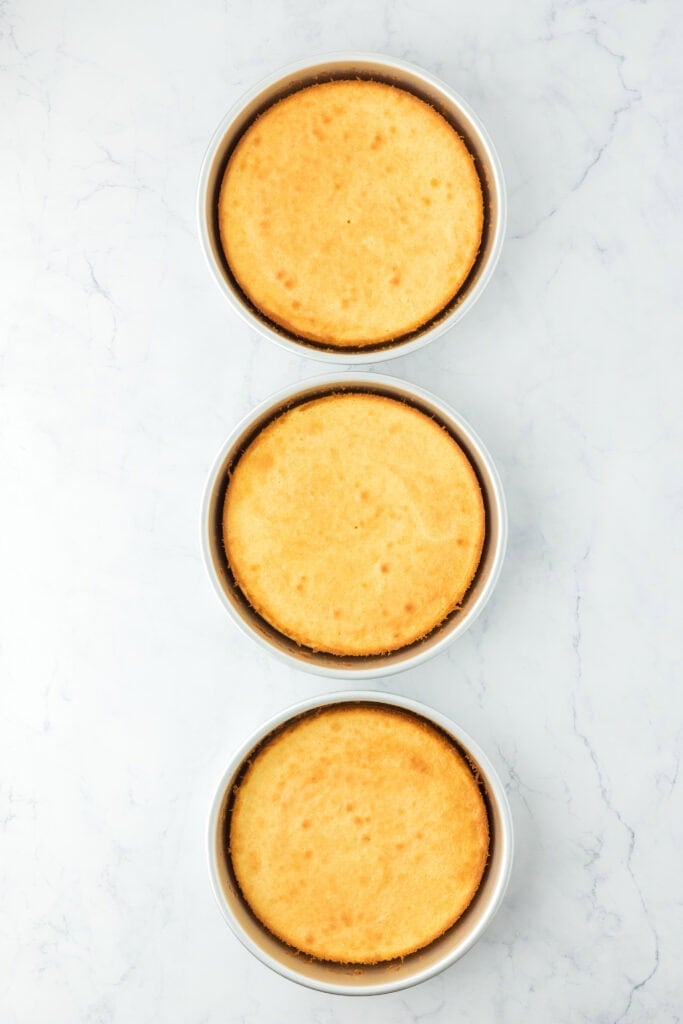
Step 8: Remove the cake pans from the oven and cool on cooling racks for 10 minutes and then remove them from the pan to continue cooling.
PRO TIP: You don’t want to overbake the cakes. I suggest checking earlier and watching closely in the last 5-10 minutes of baking so you can remove them as soon as they are done. Remember if you are using the toothpick test, a few moist crumbs are fine. It shouldn’t come out completely clean.
Make the Caramel Cake Icing
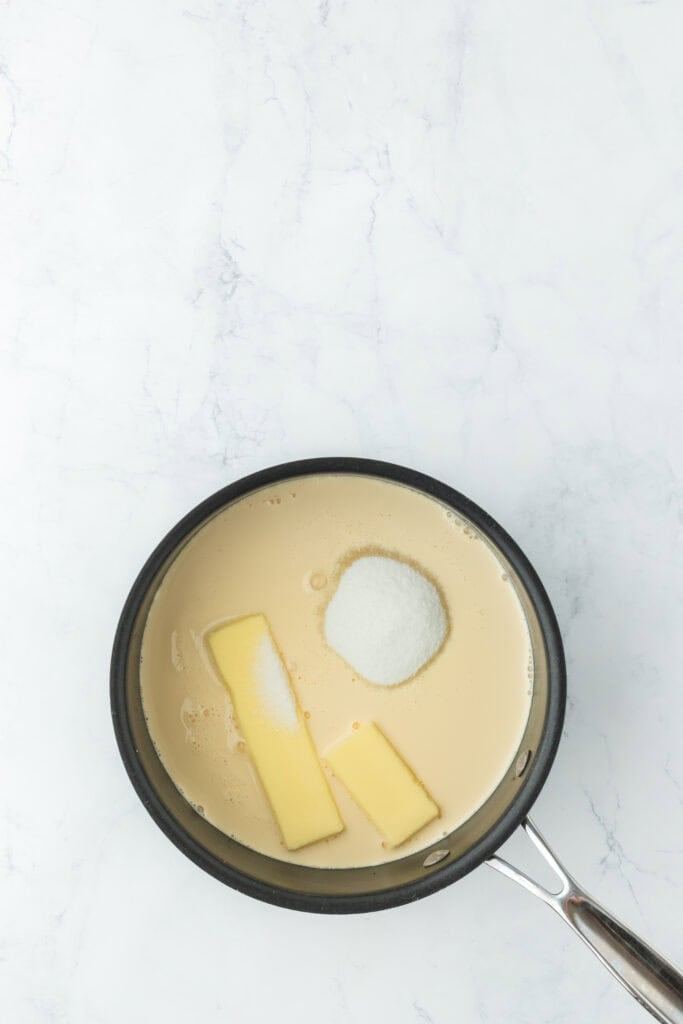
Step 9: Add the butter, evaporated milk, and sugar to a saucepan over medium heat, mix together after it all melts.

Step 10: Cook over low to medium heat for about 1 1/2- 2 hours, stirring consistently and watching the entire time to make sure it does not burn. Once it has thickened and the caramel has darkened to a beautiful golden brown, it’s good to go boos.
Want to Save This Recipe, Boo?
TOP TIP: Remember to make sure that the caramel turns the color and thick texture of the photo BELOW before stopping the heat. It should also COMPLETELY coat the back of a spoon and slowly slide off to ensure thickness.
Ice the Cake
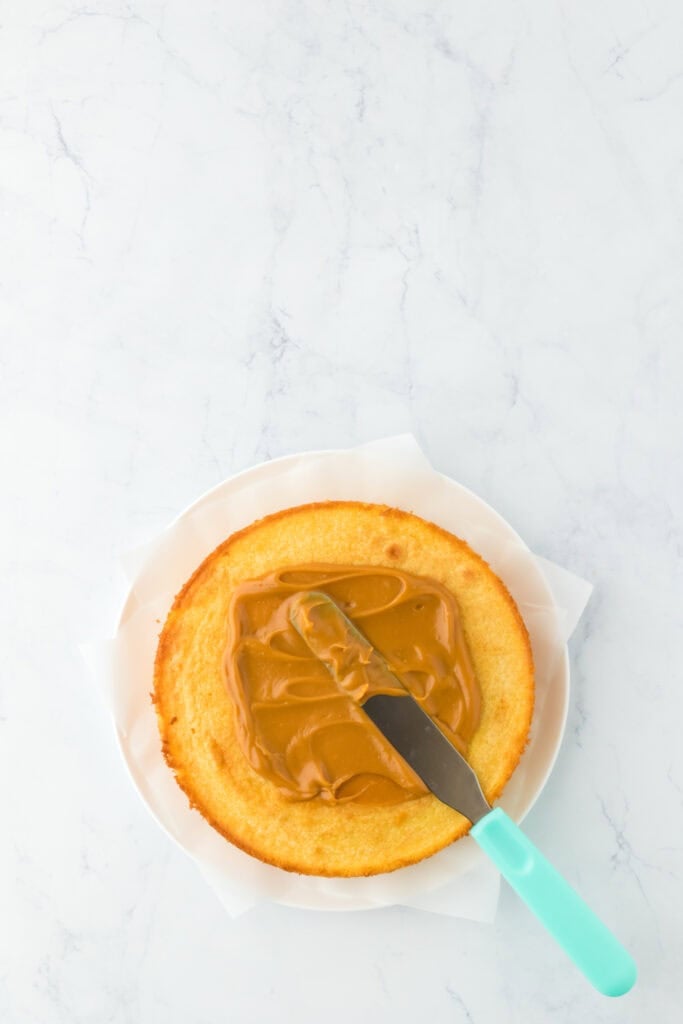
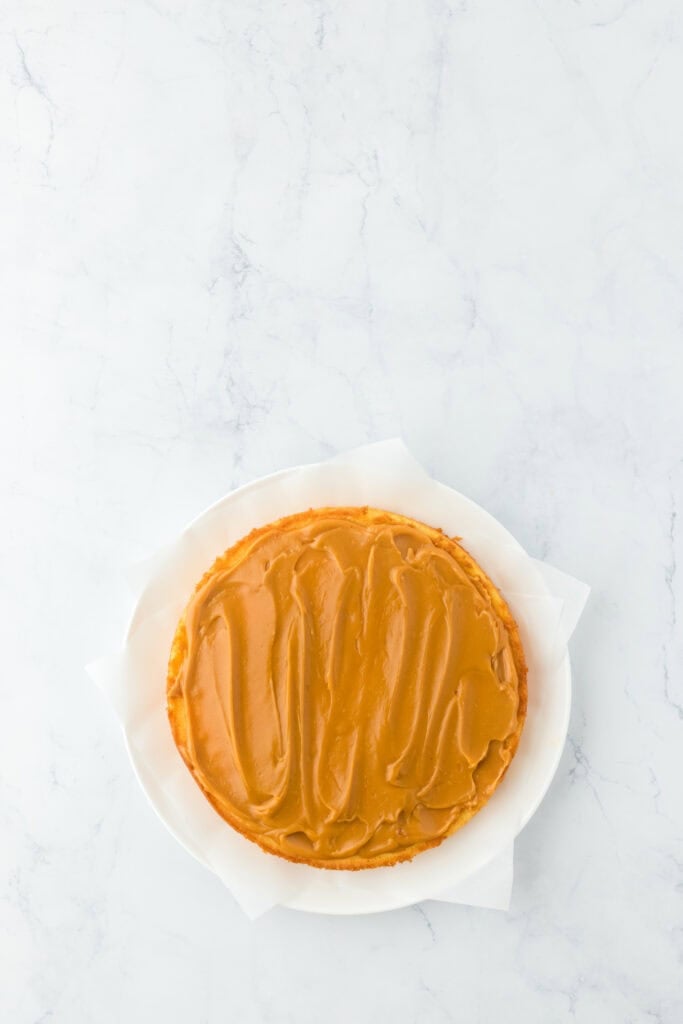
Step 11: Once cake layers are cooled, add a small dollop of icing to the center of your cake plate then place the first layer on top (no need to level the cake). This will help it stay in place. Using an offset spatula, spread a 1/4 of the caramel icing over the first layer spreading to the ends. Let it set for about 5 minutes so it can firm up just a bit.
Step 12: Then carefully add the next layer and center it directly over the first layer. Repeat adding another 1/4 of the icing and spreading over it. Set another 5 minutes.

Step 13: Finally repeat with the final layer of the cake adding right on top.

Step 14: Spread the remaining caramel cake icing over the top and around the sides of the cake. It ain’t gotta be perfect because it’s homemade ya dig? Let it set for about 30 minutes to set then get ready to serve it up!
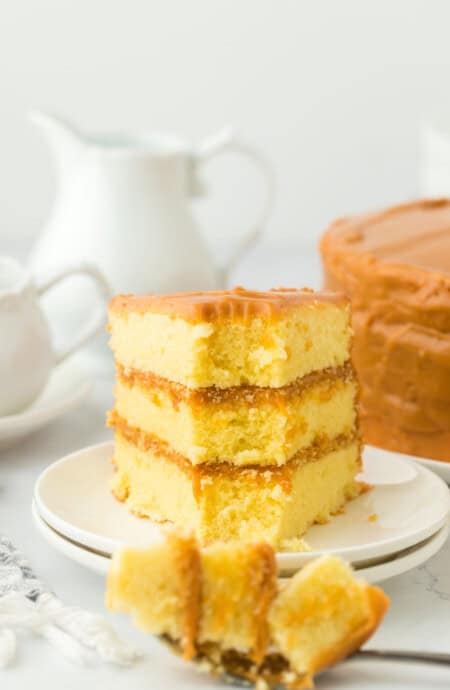
Caramel Cake recipe
Want to Save This Recipe, Boo?
Equipment
- 8 inch round cake pans
Ingredients
For the Cake:
- 1/2 cup unsalted butter 1 stick, room temperature
- 1/2 cup vegetable oil
- 1 1/2 cups granulated sugar
- 2 large eggs room temperature
- 2 large egg yolks room temperature
- 1 tablespoon pure vanilla extract
- 2 3/4 cups cake flour
- 1 1/2 teaspoons baking powder
- 1 teaspoon kosher salt
- 1/2 teaspoon baking soda
- 1 1/4 cups sour cream room temperature
- 1/3 cup heavy whipping cream room temperature
For Aunt Bev’s Caramel Icing:
- 3/4 cups salted butter 1 1/2 sticks
- 24 oz evaporated milk 2 (12 oz cans)
- 2 cup granulated sugar
- 2 teaspoons pure vanilla extract
Instructions
For the Cake:
- Start by preheating your oven to 325°F then liberally spray 3 (8-inch) round cake pans with non-stick baking spray or grease and flour.
- In your mixer bowl, add oil and butter and beat for 2 minutes on high speed. Slowly add in sugar and beat on high speed for an additional 4-5 minutes until very pale yellow and fluffy.
- Next, add eggs, one at a time, combining well after each addition and scraping down the sides as needed.
- Add in vanilla extract and mix.
- Sift cake flour, baking powder, salt and baking soda into a medium sized bowl. Turn your mixer down to its lowest speed, and slowly add flour into batter in two increment. Be careful not to over beat.
- Lastly, add sour cream and heavy cream and scrape down sides and mix until just combined and turn off mixer.
- Evenly pour cake batter into prepared baking pans and place in oven to bake for 17-24 minutes or until a toothpick inserted into the center of the cake comes just barely clean but don't over bake!! I personally start checking the cakes around 16 minutes just to be sure since everyone's oven is different.
- Remove cakes from oven and rest in pans for 10-15 minutes. Invert cakes from pans onto cooling racks until cooled.
For the Caramel Icing:
- Add butter, evaporated milk, and sugar to saucepan over medium low heat until everything has melted together.
- Leave over medium low heat stirring consistently for about 1 1/2- 2 hours (watch the entire time to make sure it does not burn until thickened and caramel has darkened to a beautiful golden brown. Note: if it is taking a while, you can turn up the heat a little more to speed up the thickening process but you MUST WATCH CAREFULLY AND STIR FREQUENTLY.
- Make sure that the caramel turns the color of the photo below before stopping the heat. It should thicken to the texture in the video as well.
- It should also thickly coat the back of a spoon to ensure thickness. See notes below for additional tips for the caramel.
- Be careful to watch, adjusting heat temperature to not let it burn.
- Remove from heat and stir in vanilla extract.
- Cool for about 15-20 minutes to allow it to thicken before icing the cake. If you see that it is too warm and still not completely thick enough, cool it in the refrigerator and get it thick!
- P.S. Some people like to take the caramel and whip it in a stand mixer to create more of a frosting texture. That is totally up to you.
To Assemble
- To assemble, make sure those cake layers have cooled down completely.
- Add a small dollop of icing to the center of your cake plate or stand then place the first layer on top. This will help it stay in place.
- Using an offset spatula, spread a 1/4 of the caramel icing over the first layer spreading to the ends. Let it set for about 5 minutes so it can firm up just a bit.
- Then carefully add the next layer and center it directly over the first layer. Repeat adding another 1/4 of the icing and spreading over it. Set another 5 minutes.
- Finally repeat with the final layer of the cake adding right on top. Spread the remaining caramel cake icing over the top and around the sides of the cake.Let it set for about 30 minutes to set then get ready to serve it up!
Video
Notes
Original Cake Recipe – More butter/Eggs
Several of you have been asking for the original cake recipe, and also asking why the change. The original recipe (below) calls for double butter as well as double eggs; with the prices of everything going up, I wanted to create a more cost-effective version, which I still think tastes amazing. But, if you prefer the older version, you can now make it!For the Cake:
- ▢1 cup unsalted butter, room temperature 2 sticks
- ▢⅓ cup vegetable oil
- ▢2 ½ cups granulated sugar
- ▢6 large eggs room temperature
- ▢2 large egg yolks room temperature
- ▢1 tablespoon pure vanilla extract
- ▢3 cups cake flour, sifted
- ▢1 teaspoon baking powder
- ▢½ teaspoon salt
- ▢1 cup sour cream
Instructions
-
Preheat oven to 350 degrees.
-
In a large mixing bowl, cream butter, oil and sugar on high until fully incorporated and light and fluffy, about 5-6 minutes.
-
Turn mixer to medium speed and mix in eggs and egg yolks one at a time until well incorporated.
-
Add in vanilla extract and mix.
-
Sift cake flour, baking powder and salt into a medium sized bowl.
-
With mixer on slow speed, alternate adding in flour mixture and sour cream ending with flour mixture until mixed through.
-
Do not over mix.
-
Spray three 9 inch round cake pans with baking spray or grease and flour them.
-
Pour batter into individual cake pans evenly.
-
Bake in preheated oven for 23-30 minutes or until fully baked (but DON’T OVERBAKE THESE CAKES- CHECK THEM EARILER SO THEY DON’T DRY OUT).
-
Remove cake pans from oven and cool on cooling racks for 10 minutes.
-
Remove cakes from pans and wait until completely cooled to ice.
How To Store Classic Caramel Cake
- Room Temperature: This cake can stay at room temp for up to 3 days due to the high sugar content in the cooked icing. Just add to a cake carrier to keep it protected.
- Fridge: Wrap your cake loosely with plastic wrap or add to a cake carrier to keep it from drying out. It will last about 4 days.
- Freezer: Double wrap your iced cake loosely in plastic wrap so it creates a good sealing. Then wrap the plastic wrap with foil for an extra layer of freezer burn protection. It should last about 2 months boos.
- How to Re-Serve: Bring your slices back to room temperature before serving it up! It will soften the texture and return the caramel icing back to silky glory.
Ingredient Swaps and Notes
For the Cake Batter
-
- Butter: It needs to be room temperature. If you only have unsalted, add in a pinch of salt to the icing. If you only have salted butter, omit the salt in the cake batter.
-
- Oil: With over a decade of recipe development and testing experience, I have learned that butter cakes can sometimes dry out if you let them overbake slightly so I give y’all some insurance by adding just a little vegetable oil in to keep it moist.
-
- Granulated sugar: For sweetness. Make sure you don’t cut the creaming time so it blends in well with the butter.
-
- Cake Flour: This keeps the cake from developing too much gluten and getting tough. Make sure you sift too! If you don’t have any, grab all-purpose flour and cornstarch and follow these steps on how to make cake flour.
-
- Eggs: They bind the cake together and give structure! Egg yolks have more moisture than egg whites so we add a couple in.
-
- Baking powder, baking soda and salt: No baking powder? Combine 1 teaspoon of cream of tartar with 1/4 teaspoon of baking soda to create a great substitute.
-
- Sour cream: Sub in buttermilk or even plain greek yogurt.
-
- Heavy Whipping Cream: Half and half also works here, as well as whole milk.
-
- Vanilla extract: Grab the very best quality you can find.
For the Caramel Cake Icing
-
- Butter: We use salted here. If you only have unsalted, toss some salt in.
-
- Evaporated Milk: Keeps the texture smooth.
-
- Granulated Sugar: For sweetness.
-
- Vanilla extract: Again, use the best quality.
Nutrition
Recipe Tips
- This cake recipe takes planning boos. Make sure you allow plenty of time to bake this up- at least three hours from start to finish.
- Is your cake sliding? It’s because the caramel icing recipe is too thin and needs to be thickened some.
- Make sure the cakes are fully cool before icing.
- After cooling the icing, if you see that it is too warm and still not completely thick enough, cool it in the refrigerator to allow it to thicken more.
- Want more of a frosting texture? Some people like to take the caramel and whip it in a stand mixer to create more of a frosting rather than an icing. That is totally up to you.
- Give it time to cool. I like to let it cool at least 30 minutes. It will help with frosting the cake without the icing dripping everywhere and the layers sliding too much.
Recipe Help
Yep you sure can. You can make the layers ahead and freeze by wrapping them tightly with plastic wrap so they don’t get any freezer burn. Just let them come back to room temperature before you ice the cake. You can also make the icing ahead of time and pop in an airtight container in the fridge. When you are ready to ice the cake, reheat gently on the stovetop and add a little warm milk to loosen it if necessary.
Remember not to remove your icing from the stove until it is completely thickened and coating the back of a spoon and slowly falling off. If you still ended up not thickening enough, you can stick the caramel in the fridge after you finish it to allow it to thicken more. Wait for it to solidify some, and then add a little warm milk if you need it to be more spreadable.
Easy fix y’all! Just loosen it up by adding just a bit of warm milk.
Your Cake Creations
I love seeing your Real Deal Caramel Cake Recipe Creations!! Check out some of the amazing photos I have received! After more than 10 years, I must say my southern caramel cake recipe is still one of my top ones!

More Caramel Recipes
- Homemade Caramel Pie
- Caramel Buttercream Frosting
- Caramel Apple Cheesecake
- Salted Caramel Chocolate Chip Cookies
This post was published in November 2012. It has been updated with new content.
 pinterest
Does it have to be cake flour or can u use regular flour?
You can use regular flour but the texture of the cake won’t be the same, I do recommend using cake flour.
When I saw this recipe had anything less than a 5 star rating I had to leave a review. For over 20 years caramel icing had defeated me and I consider myself a very skilled baker. I tried this recipe and it definitely elevated my cake game. It’s so easy and fool proof.
Awe, thanks so much, doll!
Would you be able to make this in a 9×13 pan instead?
You can, but you’ll likely end up with leftover batter and caramel.
I made this recipe exacTly as written. It was amazing! I still had issue with the icing running off the cake. I cooked it for 1 hr 45 minutes. I chilled it in the Fridge. My Cakes were completely cooled.
It was definitely the right consistency, what else can i do to prevrnt This as i want to put this recipe in regular use.
I personally like to set each layer of cake after I ice it. So add your caramel to one layer, let it set for a few minutes then add the next and add icing. This will give you time to make sure it is really set. Then finally add the last and let it set and add the rest.
Can I make the icing in a slow Cooker? I know i will get sidetracked in the 1.5 to 2 hours it will take on the stovetop.
I don’t totally recommend this because it doesn’t thicken the same because the heat is too long. You need it to thicken and reduce.
I made this caramel cake and i want to just say thank you!
I would cringe every time someone wanted me to make a caramel cake. but now that i used your recipe, i’m like no problem! thank you#grandbabycakes
Thank you, Mrs. Banks for making it!
Hi. If i was to speed up the caramel process, whats the MINIMUM time to spend on it?
It’s just something you can speed up, I’m sorry!
Does the recipe need to be adjusted if using a bundt pan? I don’t want to make too much batter or icing
I actually wouldn’t make this cake in a bundt pan. I usually suggest making this cream cheese pound cake or sour cream pound cake then halving the caramel recipe to drizzle over the top. I hope that’s helpful. https://grandbaby-cakes.com/sour-cream-pound-cake-recipe/ https://grandbaby-cakes.com/cream-cheese-pound-cake-recipe/
I’ve been wanting a caramel cake like this since I was a kid. Never could find anyone who could make it. Thank you for this recipe! This was the best and my absolute favorite to make and eat!
So happy you liked it!
Can this recipe be conv to a sheet cake?
Hi Jay! I don’t see why not! I have not tested it as a sheet cake though so don’t have the measurements or cooking times for you. If you do make it as a sheet cake let me know how long you end up cooking it for and how it turns out!