
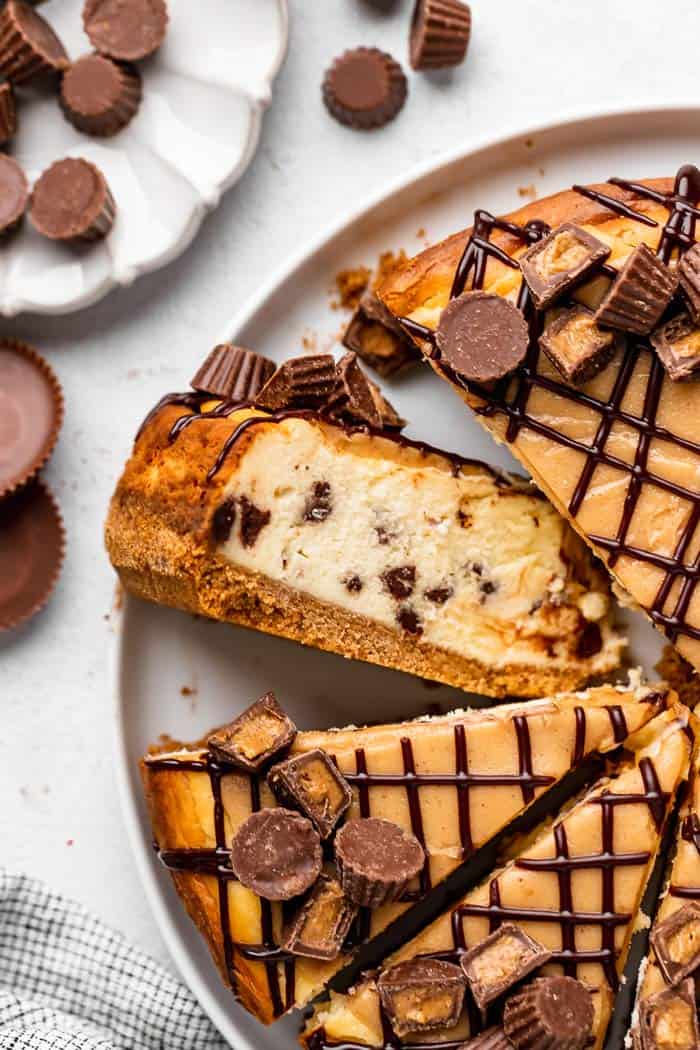
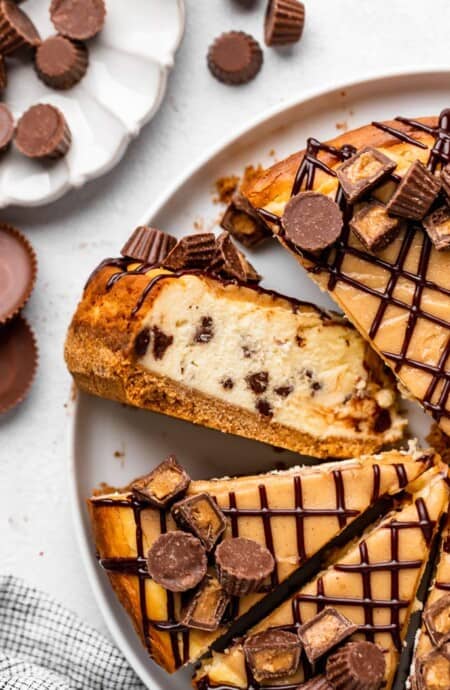
If you love a good peanut butter cup, my peanut butter cheesecake is made for you. I use my go-to vanilla cheesecake as the base because it just doesn’t get any better than that. Then I fill it with chocolate chips and add a salty sweet peanut butter glaze on top with a little chocolate ganache drizzle. If you loved my easy peanut butter pie, then it’s time to upgrade and give yourself a challenge with this recipe. It’s worth it. Trust!
This post may contain affiliate links. Read our disclosure policy.
How to Make Peanut Butter Cup Cheesecake
For The Crust
- Preheat oven to 350 degrees F (175 degrees C). Spray a 9 inch springform pan with at least 2 ¾ inch sides or a 10 inch springform pan with non-stick baking spray. Make sure it is properly secured too!
- Whisk together graham cracker crumbs, sugar and melted butter. Press mixture into the bottom of the springform pan and bake in the oven for 10 minutes.
For the Cheesecake Filling
- In the bowl of your stand mixer, beat together cream cheese and sugar until completely smooth. Next add heavy cream then add eggs one at a time, mixing until incorporated.
- Next add sour cream, vanilla bean paste and flour and mix until smooth.
- Finally fold in the chocolate chips and pour cheesecake filling into baked crust.
- Bake cheesecake for 1 hour and 10 minutes then turn the oven off and allow the cake to cool in the oven with the door slightly cracked for 4 hours.
- Remove cheesecake from oven and allow it to come to room temperature.
For the Peanut Butter Glaze
- Whisk the glaze ingredients together until they are smooth and pourable.
Want to Save This Recipe, Boo?
For the Chocolate Ganache
- Heat the heavy cream and chocolate chips over low heat in a pan while continuously whisking until everything is melted and smooth. Allow to cool to room temperature before adding to the top of the cheesecake.
To Assemble
- Once cheesecake has completely cooled and has been at room temperature for at least 30 minutes, decorate cheesecake with both peanut butter glaze and ganache and then store in the refrigerator overnight before serving.
Peanut Butter Cup Cheesecake Recipe
This Peanut Butter Cup Cheesecake has a creamy cheesecake filling with chocolate chips, then gets topped with both a peanut butter glaze and a chocolate ganache!
Want to Save This Recipe, Boo?
Servings: 12 servings
Ingredients
For The Crust
- 1 1/2 cup graham cracker crumbs
- 3 tbsp granulated sugar
- 5 tbsp melted butter
For The Cheesecake Filling
- 4 cream cheese packages 8 ounces packages/ room temperature
- 1 1/2 cup granulated sugar
- 3/4 cup heavy cream
- 4 large eggs room temperature
- 1 cup sour cream room temperature
- 1 1/2 tbsp vanilla bean paste
- 1/4 cup all-purpose flour
- 1 cup chocolate chips
For the Peanut Butter Glaze
- 3/4 cup sifted powdered sugar
- 4 tbsp heavy whipping cream up to 5
- 2 tbsp creamy peanut butter
- 1 tsp vanilla extract
For the Chocolate Ganache
- 1/2 cup heavy whipping cream
- 3/4 cup semi-sweet chocolate chips
Instructions
For The Crust
- Preheat oven to 350 degrees F (175 degrees C). Spray a 9 inch springform pan with at least 2 ¾ inch sides or a 10 inch springform pan with non-stick baking spray. Make sure it is properly secured too!
- Whisk together graham cracker crumbs, sugar and melted butter. Press mixture into the bottom of the springform pan and bake in the oven for 10 minutes.
For the Cheesecake Filling
- In the bowl of your stand mixer, beat together cream cheese and sugar until completely smooth. Next add heavy cream then add eggs one at a time, mixing until incorporated.
- Next add sour cream, vanilla bean paste and flour and mix until smooth.
- Finally fold in the chocolate chips and pour cheesecake filling into baked crust.
- Bake cheesecake for 1 hour and 10 minutes then turn the oven off and allow the cake to cool in the oven with the door slightly cracked for 4 hours.
- Remove cheesecake from oven and allow it to come to room temperature.
For the Peanut Butter Glaze
- Whisk the glaze ingredients together until they are smooth and pourable.
For the Chocolate Ganache
- Heat the heavy cream and chocolate chips over low heat in a pan while continuously whisking until everything is melted and smooth. Allow to cool to room temperature before adding to the top of the cheesecake.
To Assemble
- Once cheesecake has completely cooled and has been at room temperature for at least 30 minutes, decorate cheesecake with both peanut butter glaze and ganache and then store in the refrigerator overnight before serving.
Notes
Leftover cheesecake should be tightly wrap your leftovers with plastic (or saran) wrap or store them in an airtight container. Kept in the refrigerator, cheesecake will last for up to 5 days.
To freeze, set in the fridge, remove the springform pan and wrap the cheesecake tightly with plastic wrap and a layer of aluminum foil. It can be frozen for up to 2 months. Before serving, thaw the frozen cheesecake overnight in the refrigerator.
Nutrition
Calories: 638kcal | Carbohydrates: 71g | Protein: 18g | Fat: 32g | Saturated Fat: 18g | Polyunsaturated Fat: 2g | Monounsaturated Fat: 8g | Trans Fat: 1g | Cholesterol: 130mg | Sodium: 711mg | Potassium: 384mg | Fiber: 2g | Sugar: 57g | Vitamin A: 861IU | Vitamin C: 1mg | Calcium: 349mg | Iron: 2mg
Tried this Recipe? Tag me Today!Mention @GrandbabyCakes or tag #grandbabycakes!
Recipe Tips
- Use Room Temp Ingredients: Doing so ensures that your ingredients will incorporate better with each other.
- Whip that Cream Cheese Super Well: Under whipped cream cheese will make for a lumpy batter. I suggest using a hand mixer or a stand mixer for this.
- Grease Your Pan Well: Cheesecakes shrink as they cool. So, if your pan isn’t greased it will stick to the edge as it shrinks causing edge cracking and missing chunks.
- Use a Water Bath: It will keep it from cracking.
- Don’t Overcook: Keep an eye on that cheesecake! You’ll want the edges to look puffy but the center should be jiggly. Overcooking will cause severe cracking and dry out the cheesecake.
 pinterest
Can I replace the flour with cornstarch? If yes, how much do I put?
Yes you can but you will probably need a little more cornstarch.
Ok great, thank you so much for responding
This Peanut Butter Cup Cheesecake looks absolutely divine! I love how rich and creamy it seems, and the addition of peanut butter cups makes it even more tempting. Can’t wait to try this recipe for my next family gathering—thank you for sharing!
1 hour and 20 minutes at 350 degrees Fahrenheit and. then 4 hours in the oven after that seems too long . My cheesecake came out too dry and cracked even with the water bath.
What did I do wrong?
You may need to check your temp for your oven as well or you can lower it to 1 hr and 10 min. It should be super creamy. If you find that your oven bakes fast, you can also crack your oven as well for it to cool down.
I made this for hubby’s birthday and got rave reviews. I haven’t made cheesecake in years so I was a little scared. To add to the drama, I accidentally bought half & half instead of heavy cream, so I wasn’t sure if anything was going to turn out. Overall, it was perfect. I used mini chocolate chips and they all sank to the bottom, but I regretted not using bigger chunks with more flavor. I’m fine with them lining the bottom, just wished I could taste them. The cheesecake wasn’t too sweet, which made the PB glaze and chocolate ganache exciting rather than overwhelming. I basically decorated it exactly like the picture, but I wish I had topped first with a layer of chocolate ganache, chilled it, then topped that with a layer of peanut butter glaze, and then the decorations. The peanut butter glaze was the perfect amount for topping the cake, but I had a lot of leftover ganache. I felt like I was wishing for more chocolate until I got to that outside rim. Might just be a personal preference. Other people probably appreciate the subtlety of the flavor. Also if I did bigger chocolate chunks + more ganache it might be too much chocolate. Is that really a thing tho?
Oh – the half & half vs heavy cream conundrum. Well, I googled it and ended up substituting a little bit of butter for some of the H&H in the cake batter. I used 3 tbsp of H&H in the glaze (instead of 4-5) and it turned out a perfect consistency. For the ganache I used equal parts chocolate and H&H, plus a little more chocolate. It seemed like it wasn’t completely coming together so I added a tbsp of butter and put it back in the microwave for 30 seconds, after which it looked perfect. I stored the extra in a ziploc and it still is pliable after being in the fridge for a night, which is not the case when I make ganache with heavy cream. Usually it hardens in the fridge. But it is stiff enough that I was able to get a bit of a drip effect on the edges of the cake, not just liquid dripping all the way to the bottom, so I’m calling it a success.