
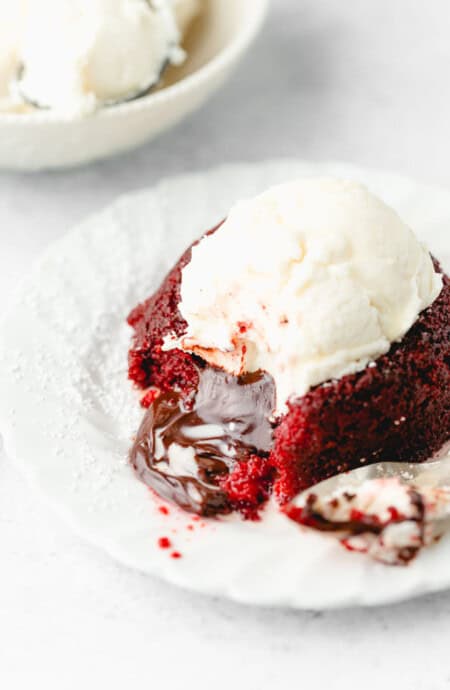
I love my red velvet lava cake recipe something fierce. It’s just got so much flavor plus that oozing chocolate center that’s a must. I make the cake part super tender and soft and moist. Add a scoop of vanilla ice cream, and get your whole life.
This post may contain affiliate links. Read our disclosure policy.

How to Make Red Velvet Lava Cakes
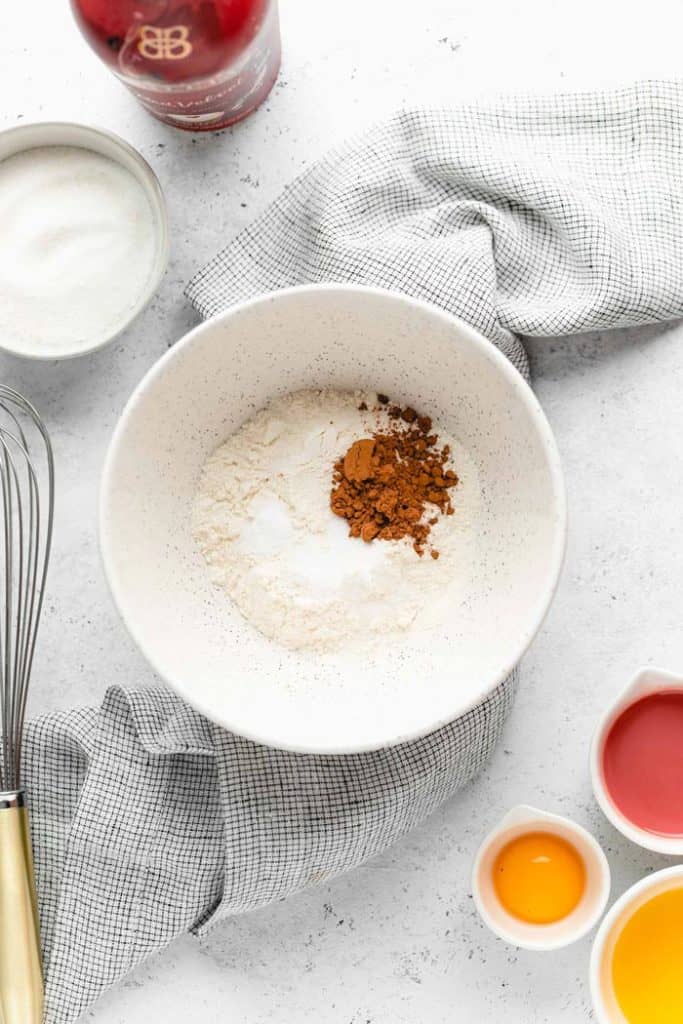
Step 1: Microwave chocolate and cream for 30 seconds, whisk smooth, cover, and chill 2 hours. Preheat oven to 400°F. Spray and dust 4 ramekins with cocoa. Whisk cocoa, flour, salt, and baking soda in one bowl; whisk butter, sugar, Bailey’s, food coloring, vanilla, vinegar, and yolk in another.
Step 2: Whisk until combined then evenly divide the batter among the 4 ramekins.
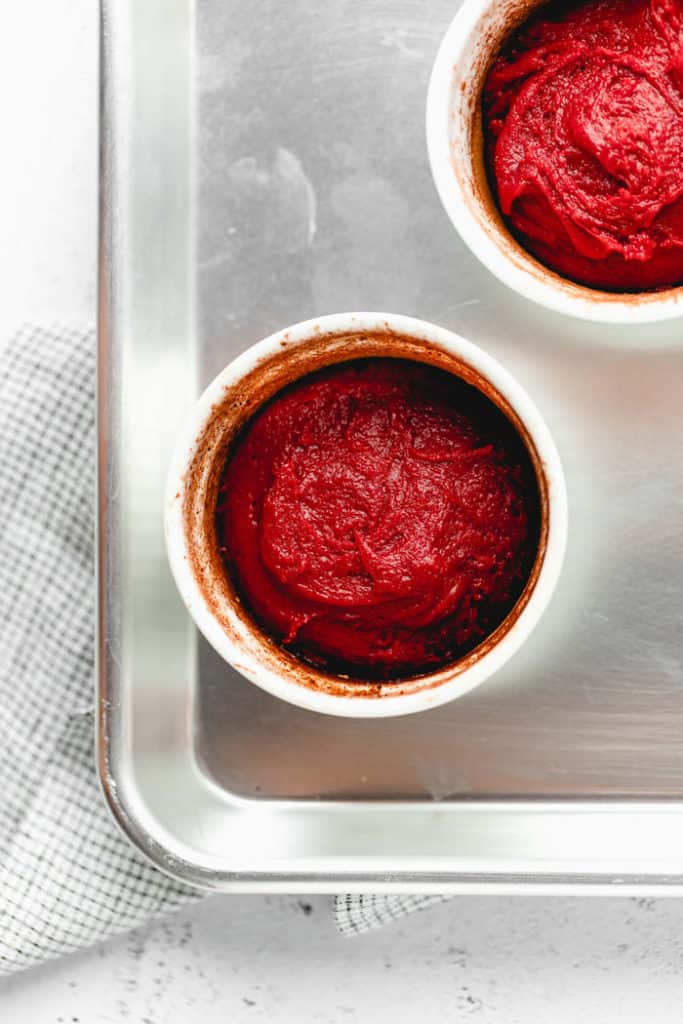
Step 3: Remove cooled chocolate from the refrigerator. Using a 1 ⅓ inch cookie scoop, scoop chocolate balls and place in the center of each ramekin and press down lightly.
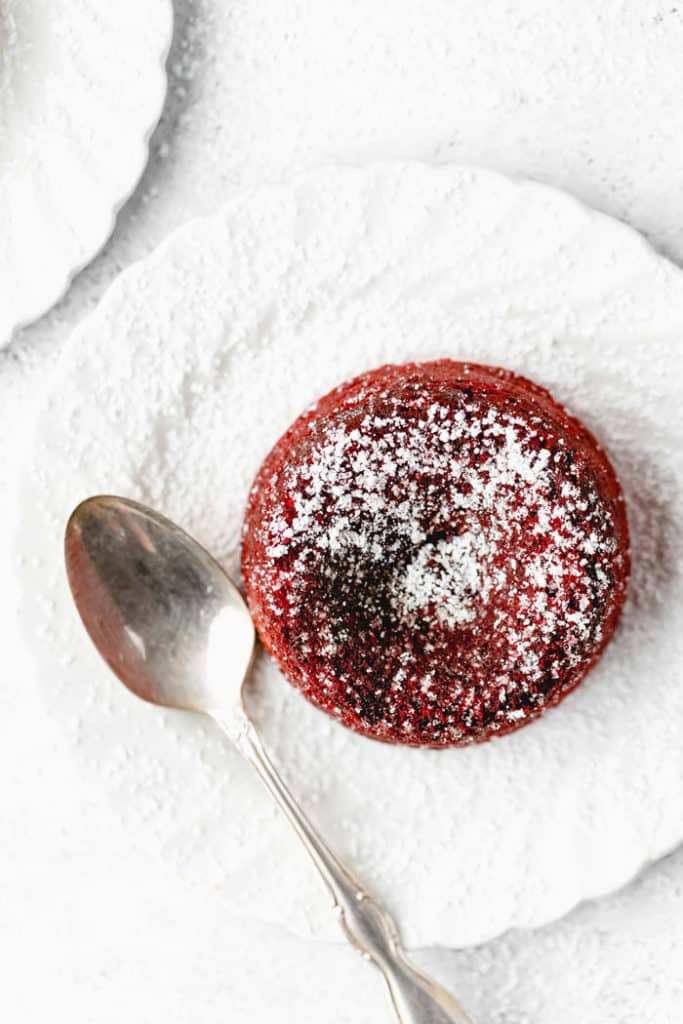
Step 4: Add ramekins to a baking sheet and bake in preheated oven for about 16-18 minutes (or until the tops spring back when lightly pressed with a finger. Once ready, remove cakes from the oven and use a thin knife to go around the outer edge of the cake and loosen then invert onto a serving plate. Dust the tops of the cakes with powdered sugar then serve with ice cream and enjoy!
Want to Save This Recipe, Boo?
Red Velvet Lava Cake Recipe
Want to Save This Recipe, Boo?
Ingredients
- 2 oz bittersweet chocolate baking bar finely chopped
- 1/4 cup heavy whipping cream
- 1 1/2 tsp unsweetened cocoa plus more for ramekins
- 1 cup cake flour
- 1/2 tsp salt
- 1/4 tsp baking soda
- 1/2 cup unsalted butter melted and cooled
- 1/2 cup granulated sugar
- 6 tbsp Bailey’s Red Velvet
- 2 tsp red food coloring
- 1/2 tsp vanilla extract
- 1/2 tsp apple cider vinegar
- 1 large egg yolk
- 1 tbsp powdered sugar
Instructions
- Add bittersweet chocolate and heavy whipping cream in a small microwave-safe bowl. Microwave for 30 seconds then whisk ingredients together until completely smooth.
- Add plastic wrap on top of the chocolate and refrigerate for 2 hours until firm.
- Preheat the oven to 400°F. Spray 4 (8-ounce) ramekins non stick baking spray then dust around all of them thoroughly with a little unsweetened cocoa, and tap out any excess.
- In a medium sized bowl, whisk together cocoa powder, flour, salt and baking soda.
- In another separate bowl, whisk together melted butter, granulated sugar, Bailey’s Red Velvet, food coloring, vanilla, vinegar, and egg yolk. Pour wet ingredients into dry ingredients and whisk until combined. Evenly divide the batter among the 4 ramekins.
- Remove cooled chocolate from the refrigerator. Using a 1 ⅓ inch cookie scoop, scoop chocolate balls and place in the center of each ramekin and press down lightly.
- Add ramekins to a baking sheet and bake in preheated oven for about 16-18 minutes (or until the tops spring back when lightly pressed with a finger.
- Once ready, remove cakes from the oven and use a thin knife to go around the outer edge of the cake and loosen then invert onto a serving plate. Dust the tops of the cakes with powdered sugar then serve with ice cream and enjoy!
Notes
Nutrition
Recipe Help
Once removed from the oven, allow the lava cakes to sit in the ramekins for about 2-3 minutes. In the meantime, grab your small serving plate and place it on top of the ramekin. Place one hand on the plate and using the other hand (which should have an oven mitt on), quickly flip over the ramekin. Slowly pull up the ramekin and voila, you’ve got a perfect lava cake!
And ya’ll, even if it doesn’t go perfectly, don’t sweat it! Dust with powdered sugar or layer on a hefty scoop of vanilla ice cream. Flavor is what matters here.
You can refrigerate uncooked lava cake batter in ramekins up to 24 hours ahead. I suggest placing parchment paper cut to size at the bottom of each ramekin before spraying with non-stick spray. This will make sure the bottoms don’t stick after sitting there a while. You can also make the batter and refrigerate in the bowl covered for up to 2 days. When you want to bake, remove from the fridge and let sit out for at least 30 minutes before baking.
 pinterest
I can’t find the baileys red velvet. Can I substitute for something else or leave it out all together.
You can also use a plain Irish cream instead.
Can this be made without the red dye?
What adjustments are needed at high altitude?
Everything looks delicious, as always. Happy Birthday to your sweet daughter, Harmony. I love your site, you always put a smile on my face each time I read your posts. It is nice to see a beautiful smile. I hope you get your own food network show.
Great Christmas dessert! My family loved it:)
I can’t wait to try this recipe at home, it looks very tasty!
This looks like something my family would love. I can’t wait to try it!
Yummy! This looks so delicious and tasty! I can’t wait to give this a try!
That looks incredibly delicious and so pretty! My kids love lava cake, thanks for sharing the recipe!
This cake looks and sounds marvelous! I love the flavor!