
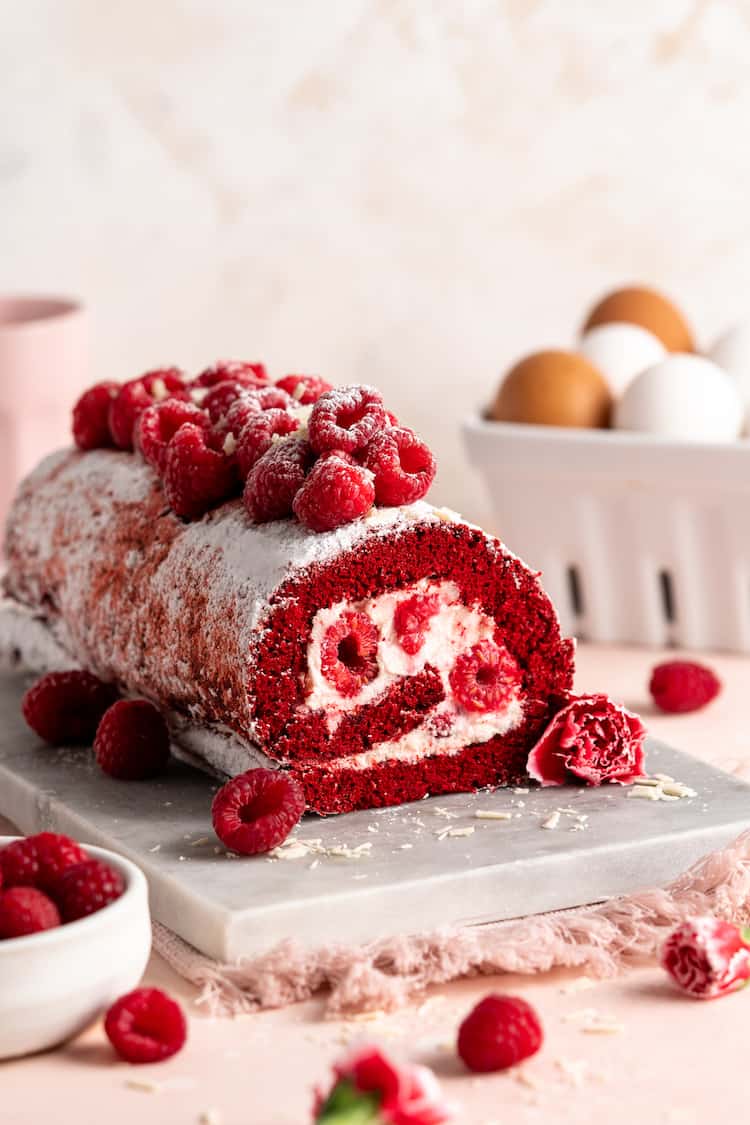
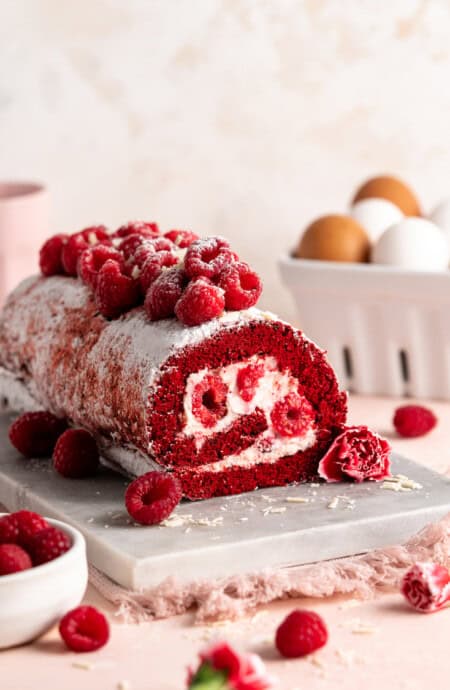
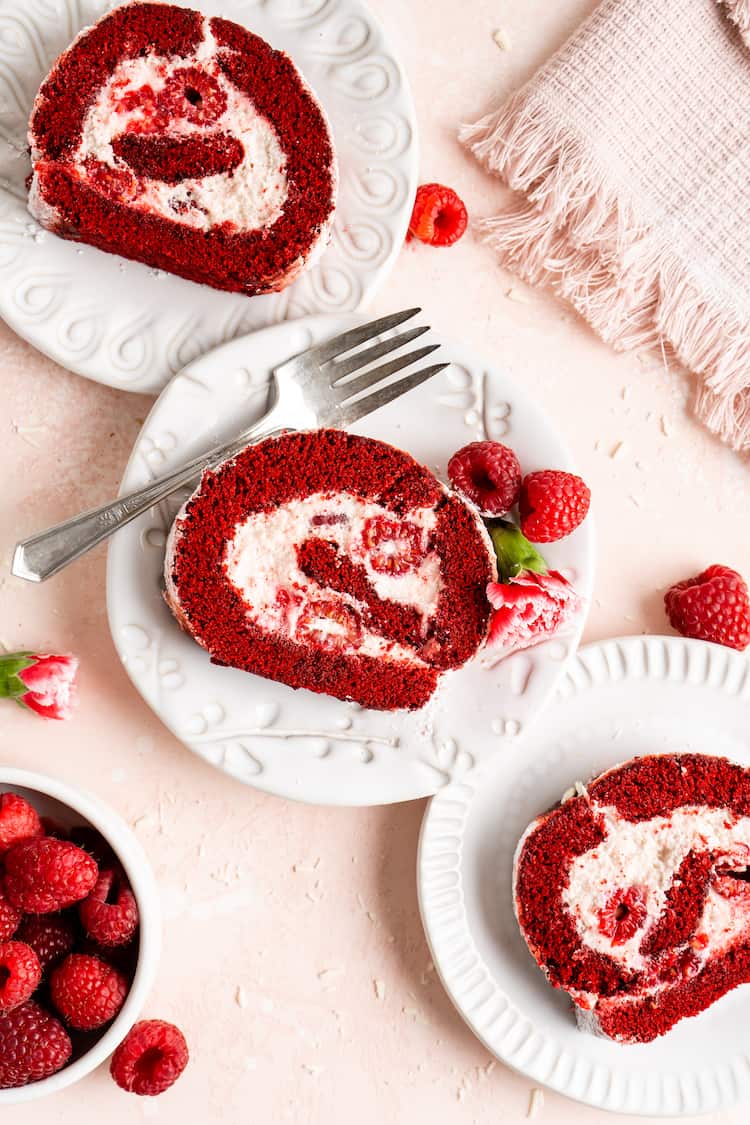
Y’all my Red Velvet Cake Roll is a straight up showstopper. I make the cake moist and tender but not too tender that it falls apart when you roll it. Then I stuff it with a white chocolate raspberry buttercream filling. Not only is it absolutely gorgeous, the flavors stay poppin.
This post may contain affiliate links. Read our disclosure policy.
How to make Red Velvet Cake Roll
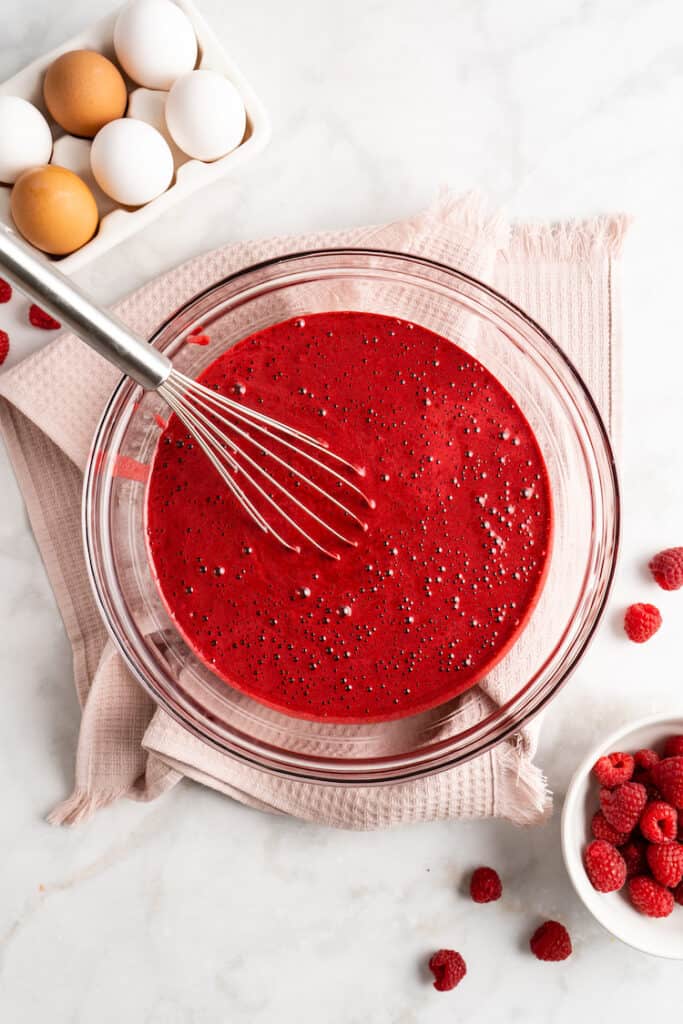
Step 1: Prep a 10 x 15-inch jelly roll pan by greasing it, lining with parchment paper, and greasing the paper again. Dust a large parchment paper or thin kitchen towel with powdered sugar. Mix dry ingredients (cake flour, cocoa powder, baking powder, salt) and wet ingredients (buttermilk, vinegar, vanilla extract) in separate bowls. In a stand mixer or using a hand mixer, beat eggs for five minutes, then gradually add brown sugar and oil. Incorporate the buttermilk mixture and red food coloring, followed by the dry ingredients, beating until smooth.
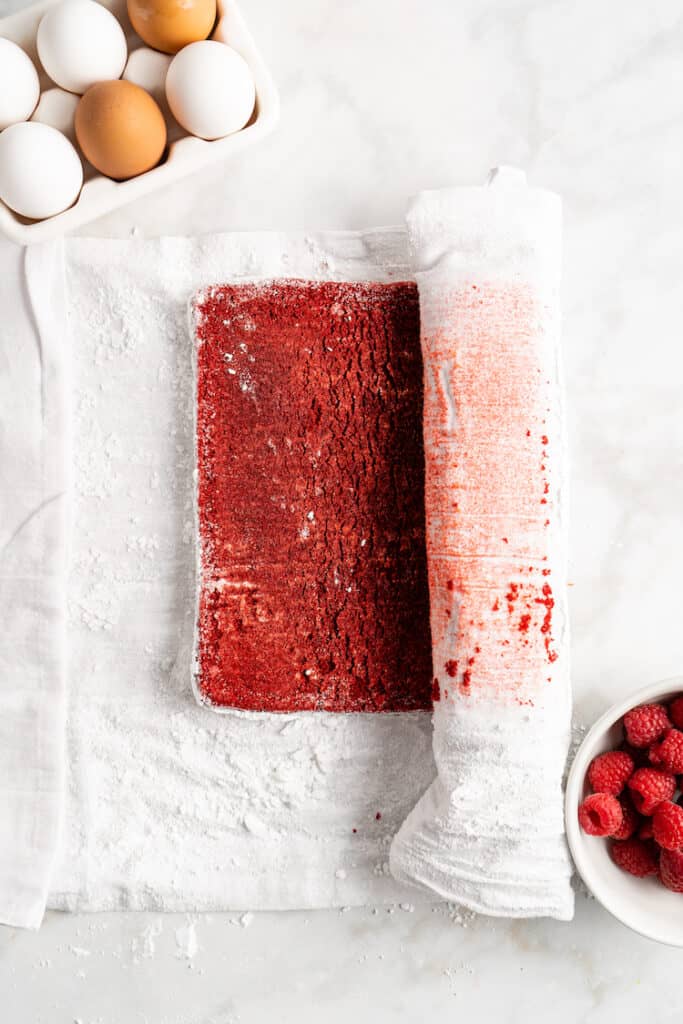
Step 2: Pour the batter into the pan, bake for 11-13 minutes, then immediately roll the warm cake with the sugared paper or towel, starting at the narrow end, and let cool on a rack. Prepare the filling while the cake cools.
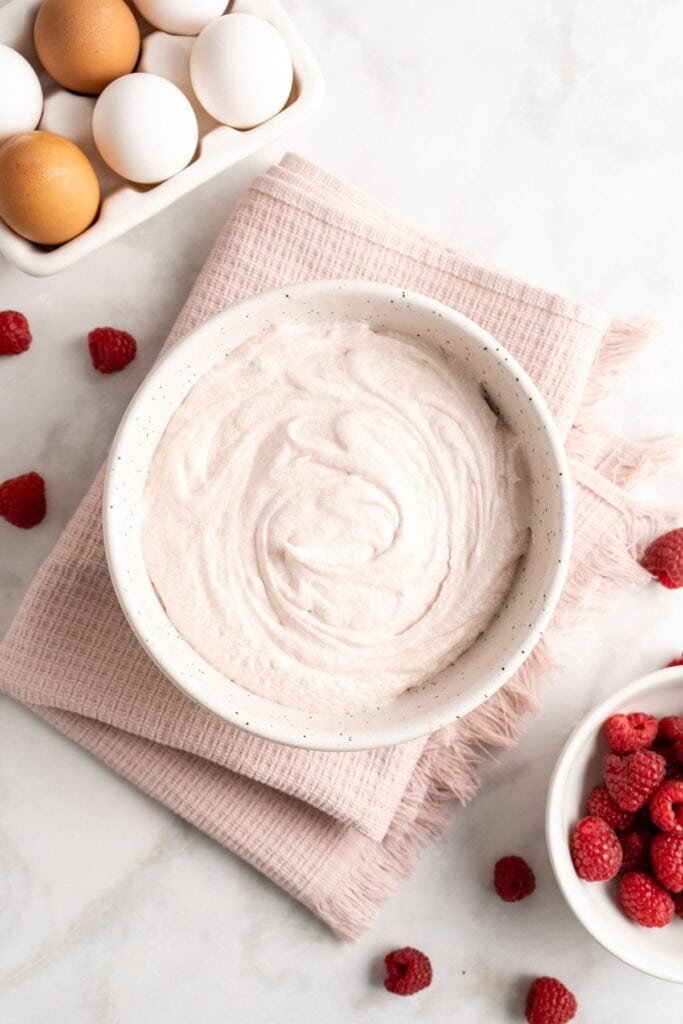
Step 3: Blend ½ cup of raspberries until smooth, strain to remove seeds, and heat the puree in the microwave until hot. Mix in white chocolate until smooth, cool completely, then beat cream cheese in a stand mixer until smooth. Add the raspberry-chocolate mixture and beat until fully incorporated. Add butter and beat for 2 minutes, then gradually mix in powdered sugar and salt until fluffy. Refrigerate the mixture until ready to use.
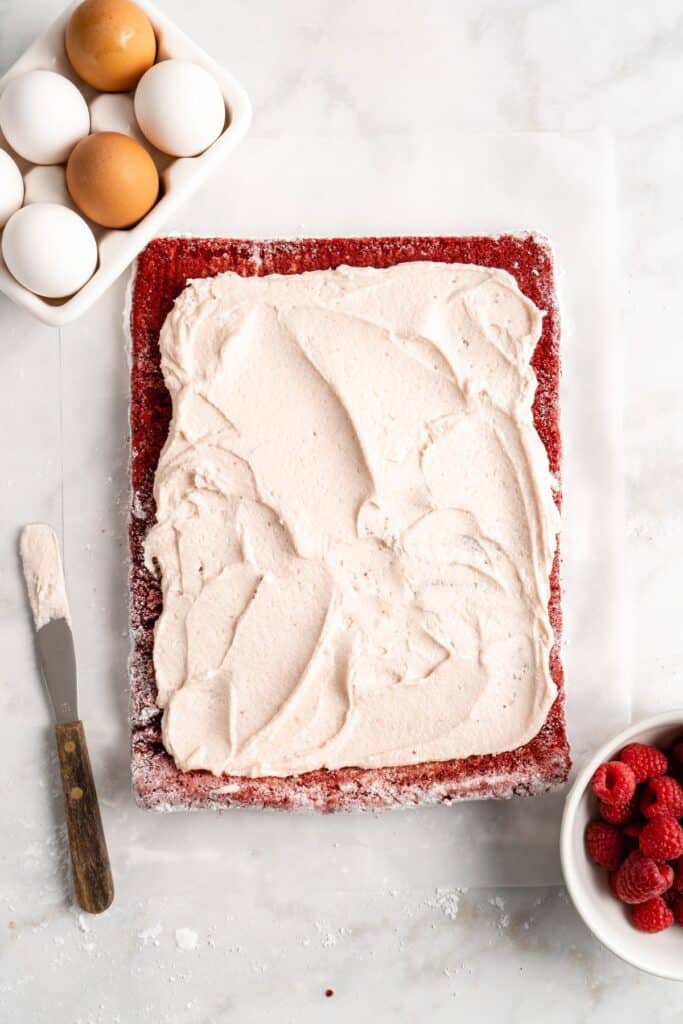
Step 4: Unroll the cake and spread the filling over the cake from edge-to-edge, leaving about ¼” on each end.
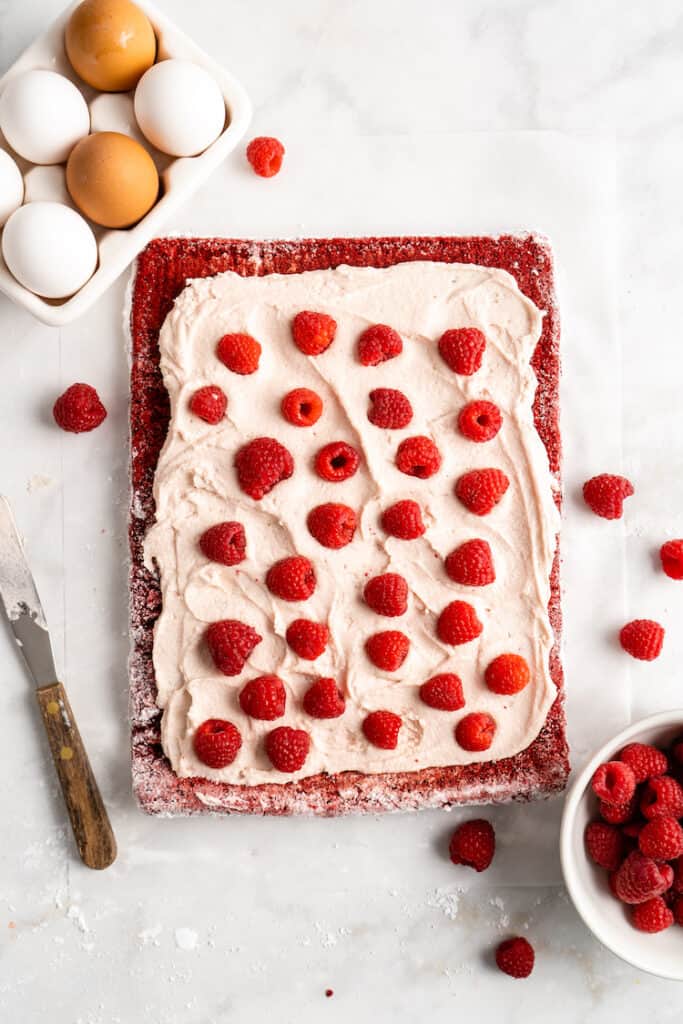
Step 5: Spread the remaining cup of the fresh raspberries over the top of the filling, making sure to disperse them evenly.
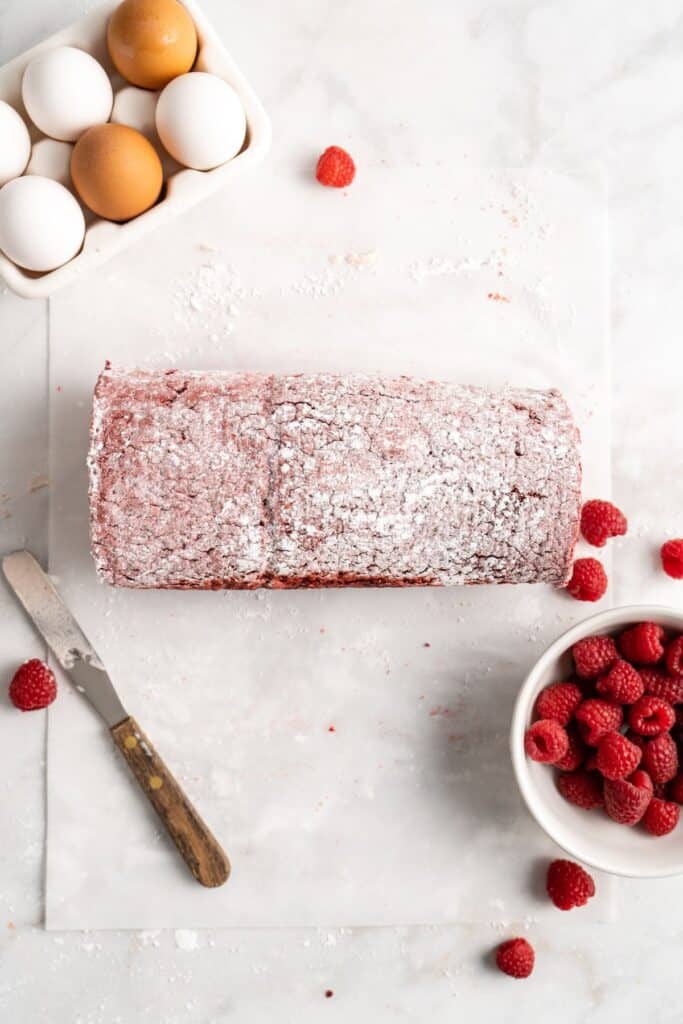
Step 6: Re-roll the cake without the towel. Wrap the cake in plastic wrap and refrigerate for at least an hour. Place cake seam-side down on a serving plate of your choice. Sprinkle it with extra powdered sugar and serve!
Red Velvet Cake Roll Recipe
Want to Save This Recipe, Boo?
Equipment
Ingredients
For the Red Velvet Cake Roll
- powdered sugar
- 3/4 cup cake flour sifted
- 1/4 cup unsweetened cocoa powder sifted
- 1 tsp baking powder
- 1/2 tsp salt
- 2 tbsp buttermilk
- 1 tsp white vinegar
- 1 tsp vanilla extract
- 4 large eggs room temperature
- 3/4 cup light brown sugar
- 1 tbsp vegetable oil
- 1 oz red food coloring
For the Raspberry White Chocolate Buttercream
- 1 1/2 cup fresh raspberries divided
- 4 oz white chocolate chopped
- 4 oz cream cheese room temperature
- 1/2 cup unsalted butter room temperature
- 2 cups powdered sugar sifted
- pinch of salt
Instructions
For the Red Velvet Cake
- Preheat oven to 350°F. Line10x15 inch jelly roll pan with parchment paper then grease with butter or shortening.
- Sprinkle a large rectangle of parchment paper or a thin kitchen towel with powdered sugar and set aside.
- In a small bowl, whisk together cake flour, cocoa powder, baking powder, and salt. Set aside.
- In another small bowl, combine the buttermilk, vinegar, and vanilla extract.
- In the bowl of a stand mixer fitted with a whisk attachment or using a large bowl and an electric hand mixer, beat the eggs with brown sugar for five minutes until fluffy and aerated. Next add in the oil then buttermilk mixture and red food coloring beating again.
- Add the flour mixture in two increments and beat on low speed until well combined, about 2 minutes.
- Pour the batter into the prepared pan and spread evenly to reach all edges. Bake for 11-13 minutes, or until the top of the cake springs back when touched.
- Immediately turn the cake out onto the previously prepared parchment paper or kitchen towel and peel off the attached paper on the cake. Very carefully roll up the cake and paper (or towel) together, starting at the narrow end. Place the cake, seam-side down, on a cooling rack to cool to room temperature, about 45 minutes.
- While you wait for the cake to cool, prepare the filling.
For the Raspberry white chocolate filling
- Blend ½ cup of raspberries until smooth in a heavy duty blender or food processor. Press through a sieve to remove the seeds.
- Pour the raspberry puree in a small microwave safe bowl and heat until hot but not boiling. Add the white chocolate and stir until smooth and combined. Allow to completely cool.
- In your stand mixer, beat the cream cheese until smooth.
- Add the raspberry white chocolate mixture until fully incorporated. Be sure to scrape the sides of the bowl at least once.
- Add the butter and powdered sugar, in intervals of half a cup at a time, along with the salt and beat until the mixture is smooth and fluffy.
- Cover and refrigerate filling until ready to use.
To Assemble
- Once cake is completely cooled, unroll the cake and spread the filling over the cake from edge-to-edge, leaving about ¼” on each end. Spread the remaining cup of the fresh raspberries over the top of the filling, making sure to disperse them evenly.
- Re-roll the cake without the towel. Wrap the cake in plastic wrap and refrigerate for at least an hour.
- Place cake seam-side down on a serving plate of your choice. Sprinkle it with extra powdered sugar and serve!
Notes
How to store Red Velvet Cake Roll
This cake can be stored in the fridge, wrapped in plastic wrap. Actually, to keep your cake as fresh as possible, I’d recommend using 2 layers of plastic wrap.How long will Red Velvet Cake Roll last in the fridge?
This cake roll will stay delicious in the fridge for about 3-4 days. But let’s be real y’all… If it’s still hangin’ around after a few days, you must have more willpower than me!Can I freeze red velvet cake roll with cream cheese filling?
Sure, boo! If you’d like to freeze a prepared cake roll, wrap it in plastic wrap and add an extra layer of heavy duty foil or place it in a zip top freezer bag. It will freeze for 2-3 months. Thaw in the fridge overnight before slicing and serving.Nutrition
Recipe Tips
- Cleaner Ends: If you’d like the ends of your roll to look cleaner, use a sharp knife to slice off about ½ an inch of cake off each side. Do this AFTER refrigeration so the filling doesn’t spill out.
- Use the Correct Sized Pan: A 10×15 jelly roll pan is necessary for this recipe so you get the right thickness and it doesn’t break or crack while you roll it.
- Make Ahead: Make the frosting while the cake bakes, then refrigerate it as the cake cools so it firms up.
- Frosting Too Loose? Pop it in the fridge and let it firm up a bit more.
Ingredient Notes
- White Vinegar: or apple cider vinegar or even lemon juice.
- Red Food Coloring: Want a natural option? Try beet juice instead.
- Fresh Raspberries: Frozen raspberries work just fine! Just make sure to thaw and drain them before mixing them in, or your filling will be watery.
- Homemade Buttermilk: Mix 1 cup of milk (whole milk works best) with 1 tablespoon of white vinegar or lemon juice. Stir it up and let it sit for about 5-10 minutes until it thickens up a bit and gets a lil’ curdled.
Want to Save This Recipe, Boo?
Recipe Help
Yep! You can bake the cake and make the filling ahead of time. Just let the cake cool completely, wrap it up, and pop it in the freezer. The filling can go in the fridge. When you’re ready to assemble, thaw the cake, spread the filling, roll it up, and you’re set!
Cracks usually happen if the cake cools down too much before you roll it up. Make sure you roll it while it’s still warm. If the cake cracks a little, don’t worry, it’s fixable. Once the filling is added and you roll the cake back, it’ll sort of “glue” back together. Plus, any other imperfections can be covered with powdered sugar or cocoa powder!
 pinterest
Is this recipe in your Cakes cookbook?
This recipe is absolutely delicious and definitely one of my new favorite dishes! Thank you for sharing this amazing recipe, I will definitely be making it again and again. Keep up the good work!
This looks gorgeous! I love the sound of that white chocolate buttercream. Can’t wait to make this!
My red velvet cake turned out so fluffy and delicious! I can’t wait to make it again!
Who doesn’t like red velvet?? I want to try these soon! Thanks for the idea!
I love this dessert for Valentine’s Day!
Ohhh yes. this red velvet cake roll is so perfect. What a great recipe!