
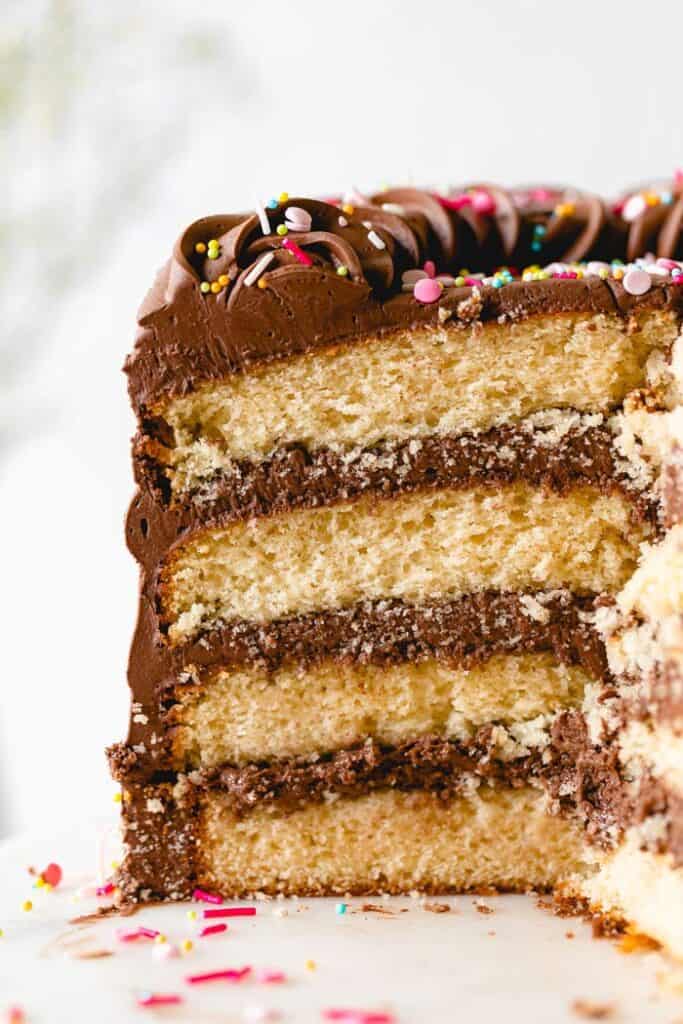
This Yellow Cake with Chocolate Frosting is old school baking done just right. Most versions have dry layers they hope the buttercream will mask but I keep my cake moist and buttery with a few unique ingredient ratios that I tested until it turned out perfectly. And the smooth chocolate frosting is the ultimate pair. Trust me when I say, this recipe will stop you from looking for another.
This post may contain affiliate links. Read our disclosure policy.
Video Tutorial
Yellow Cake Ingredient Notes
- Butter: I love a higher fat European style unsalted butter for this cake. Salted is fine to use too, just leave the salt out.
- Vegetable oil: You can swap in canola or another neutral oil.
- Cake flour: You can buy it in grocery stores but you can also make cake flour at home using all-purpose flour and cornstarch.
- Leavener: Make sure you check the expiration dates so you get a nice lift.
- Sour cream: Plain greek yogurt also works as a swap here.
- Vanilla extract: Go with real and not artificial.
- Cocoa powder: Unsweetened cocoa like Hershey’s works fine.
- Heavy whipping cream: You can also use half-and-half or whole milk.
How to Make Yellow Cake
Make the Layers

Step 1: Mix the butter, oil, then add sugar on high until good and mixed up. We are looking for nice, light and fluffy vibes so let the mixer go for about 4-5 minutes. Turn the mixer to medium speed and mix in the eggs and egg yolks one at a time until they are well incorporated. Then toss in vanilla.

Step 2: Sift the cake flour, baking powder, salt and baking soda into a medium sized bowl then slow the mixer to slow speed. Alternate adding in the dry ingredients.

Step 3: Then the sour cream and heavy cream then finally end with the rest of the dry ingredients. The batter should be silky and smooth.

Step 4: Evenly pour batter into the greased up parchment lined cake pans. Remove the cake pans from the oven and cool on cooling racks for 10 minutes and then remove them from the pan to continue cooling.
PRO TIP: After cooling, wrap each layer in plastic wrap and place them in the freezer for an hour to make the layers easier to work with when assembling the cake.
Want to Save This Recipe, Boo?
Make the Chocolate Frosting

Step 5: Add the butter, confectioner’s sugar, and cocoa powder to the bowl of your stand mixer. Mix everything together at high speed until it’s smooth.

Step 6: Add the heavy whipping cream and vanilla extract to the bowl. Beat again until the frosting is fluffy and smooth.
Frost your Cake

Step 7: Remove the cakes from the oven and let them rest in the pans for 10 minutes. Then turn the cakes out onto a cooling rack to cool for at least an hour. Spread the top of the first layer with frosting.

Step 8: Repeat with the remaining two layers until all the layers are together. Frost the sides and top of the cake and smooth it out.
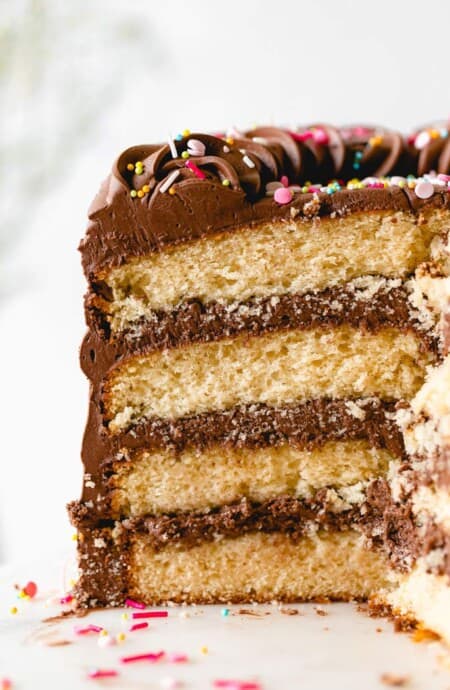
Yellow Cake with Chocolate Frosting
Want to Save This Recipe, Boo?
Equipment
Ingredients
For the Cake:
- 1/2 cup unsalted butter 1 stick, room temperature
- 1/2 cup vegetable oil
- 1 1/2 cups granulated sugar
- 2 large eggs room temperature
- 2 large egg yolks room temperature
- 1 tablespoon pure vanilla extract
- 2 3/4 cups cake flour
- 1 1/2 teaspoon baking powder
- 1 teaspoon kosher salt
- 1/2 teaspoon baking soda
- 1 1/4 cups sour cream room temperature
- 1/3 cup heavy whipping cream room temperature
For the Frosting:
- 2 cups unsalted butter 4 sticks, room temperature
- 8 cups confectioner’s sugar
- 1 cup cocoa powder
- 6 tablespoons heavy whipping cream
- 2 tablespoons pure vanilla extract
Instructions
For the Yellow Cake:
- Start by preheating your oven to 325°F then liberally spray 2 or 3 (8-inch) round cake pans OR with non-stick baking spray or grease and flour.
- In your mixer bowl, add oil and butter and beat for 2 minutes on high speed. Slowly add in sugar and beat on high speed for an additional 4-5 minutes until very pale yellow and fluffy.
- Next, add eggs, one at a time, combining well after each addition and scraping down the sides as needed.
- Add in vanilla extract and mix.
- Sift cake flour, baking powder, salt and baking soda into a medium sized bowl. Turn your mixer down to its lowest speed, and slowly add flour mixture into the batter in two increments. Be careful not to overbeat.
- Lastly, add sour cream and heavy cream and scrape down sides and mix until just combined and turn off mixer.
- Evenly pour cake batter into prepared baking pans and place in oven to bake for 17-24 minutes or until a toothpick inserted into the center of the cake comes just barely clean but don't over bake!! I personally start checking the cakes around 16 minutes just to be sure since everyone's oven is different.
- Remove cakes from oven and rest in pans for 10-15 minutes. Invert cakes from pans onto cooling racks until cooled. If you baked 2, cut the slices in half to have 4 layers.
For the Chocolate Frosting
- Add butter, confectioner’s sugar and cocoa powder to bowl of mixer and mix on high speed until smooth.
- Lastly add in heavy whipping cream and vanilla extract until frosting is fluffy and smooth.
- Frost each layer of cake with frosting then frost the end.
Video
Notes
-
- For the Fluffiest Frosting: The key to the best homemade chocolate frosting is making sure it is as fluffy as possible. This comes from beating the frosting and measuring your ingredients properly!
-
- Do NOT Over Bake: This tip is crucial for a moist and tender cake! Be sure you watch the cake closely especially the first time you bake it in your oven. You can’t always rely on just the time. Your cake is done when you insert a toothpick an it comes out mostly clean.
-
- Use Room Temperature Ingredients: All the dairy — butter, milk, sour cream — and eggs should be at room temperature. Pull them out of the fridge and let them sit for a bit before you start mixing. About an hour will do the trick.
-
- Make Sure Cakes are Cool: Before you add the frosting make sure the cakes are fully cooled. Even better — freeze the cake layers before assembling the cake. This makes the cake a little more firm and much easier to work with when frosting and layering.
-
- Mix Just Long Enough: Overmixing is detrimental to cakes especially once the flour is added to the bowl. Make sure your mixer is on low speed and ONLY mix until everything is mixed.
How to Store Yellow Cake
If you wanna serve up this cake at its absolute best, try to assemble it on the day you’re gonna show it off. Though, if you’re in a pinch, you can totally get ahead of the game and frost it a day early. And for those leftovers? Keep ’em snug as a bug in an airtight container at room temp for about 2-3 days to keep that cake as moist as can be. Got some extra chocolate frosting? No prob! Just pop it in the fridge, and it’ll be good to go for up to two sweet weeks.How long will yellow butter cake last in the fridge?
A yellow butter cake that’s been frosted will keep in the fridge for 4-5 days. I like to store it in the fridge when it’s a bit warm in the house or when I need to store it for more than 2-3 days. When it’s been refrigerated it’s a good idea to let it sit at room temperature before serving.Can I freeze yellow butter cake?
Oh, for sure! If you’re planning to get your cake game on later, you can totally freeze those baked cake layers. Just wrap each layer in its own little cozy blanket of plastic wrap and aluminum foil. Stash them in the freezer, and they’ll be good for up to three fabulous months. When you’re ready, just let them thaw out on the counter, then get down to the frosting business. You can even freeze leftover cake, whether it’s big chunks or individual slices. I like to give them a quick flash freeze on some parchment paper, then double-wrap those babies in plastic and foil. They’ll keep in your freezer for up to three months.Nutrition
Recipe Tips
- Do NOT Over Bake: Be sure you watch the cake closely especially the first time you bake it in your oven. You can’t always rely on just the time. Your cake is done when you insert a toothpick and it comes out mostly clean.
- Use Room Temperature Ingredients: All the dairy — butter, milk, sour cream — and eggs should be at room temperature. Pull them out of the fridge and let them sit for a bit before you start mixing.
- Make Sure Cakes are Cool: Before you add the frosting make sure the cakes are fully cooled. Even better — freeze the cake layers before assembling the cake.
- Mix Just Long Enough: Overmixing is detrimental to cakes especially once the flour is added to the bowl. Make sure your mixer is on low speed and ONLY mix until everything is mixed.
Recipe Help
Sure! You will get somewhere around 24-36 cupcakes from a recipe. Mix the cake batter as directed and add to your lined cupcake pan, filling each hole up two-thirds of the way full. Bake in the oven for 15-25 minutes or until a toothpick inserted in the center comes out clean.
If you’re worried about your cake leaning over after frosted here are a few tips to help. Make sure the cake is completely cool so that the frosting doesn’t melt. It’s like the glue that holds everything together. If your cakes have a significant dome on the top you can slice each one to make it even. This will make stacking them much easier. The last option is to insert sticks in several areas around the cake to hold the layers in place.

 pinterest
Hello, can I use AP instead?
You can, but it will change the texture of the sponge, just won’t be as airy.
Looking forward to baking this cake for my son’s birthday, To clarify step 5,,,do you sift all the dry ingredients together?…the end of that step then says to add to the batter separately. Thanks in advance for clarifying!
Hi, sorry for the confusion. That is a typo, I fixed it. You should sift all the dry ingredients together and then add them to the stand mixer in two increments. Happy early bday to your son, hope he loves it!
What if I don’t want 3 layers. Would it bake in a 9×13? Or would it be too much batter.
You can bake this in a 9×13 pan, and it won’t be too much batter. It’ll just give you a nice, thick sheet cake instead of layers. Keep the oven at 325°F and start checking it around 35–45 minutes. You want a toothpick to come out with just a few moist crumbs.
Hello. I switched to metrics and this is what came up. Is this correct.. It looks way off. Please help. I love measuring my ingredients, but I’m not sure if this is correct. I copied and pasted it before. Thank you! I love your recipes!❤️
2 sticks unsalted butter 1 stick, room temperature
79 ml vegetable oil
500 g granulated sugar
7 large large eggs room temperature
1 teaspoon large egg yolks room temperature
1 tablespoon pure vanilla extract
375 g cake flour
1/2 teaspoon baking powder
1 teaspoon kosher salt
1/2 teaspoon baking soda
230 g sour cream room temperature
0.33 cup heavy whipping cream room temperature
Thank you for checking I actually don’t bake in metric. Since they were converted manually, I can’t confidently say they’re correct. For best results, I really recommend sticking with the U.S. cup measurements as written, since that’s how the recipe was developed and tested. I’d hate for you to put in the work and not get the cake you’re expecting.
The cake was so moist and delicious. I placed in freezer for one hour based on your pro tip suggestion and it was a game changer for frosting the cake. Only a few slices left from our family gathering. This recipe is a keeper.
Thank you so much! I’m so glad the freezer tip helped; it really is a game-changer for frosting! Happy to hear it was a hit at your family gathering. Appreciate you trying the recipe and sharing your feedback!
This looks delicious! How much butter extract was used in the original recipe?
Just a teaspoon I believe.