
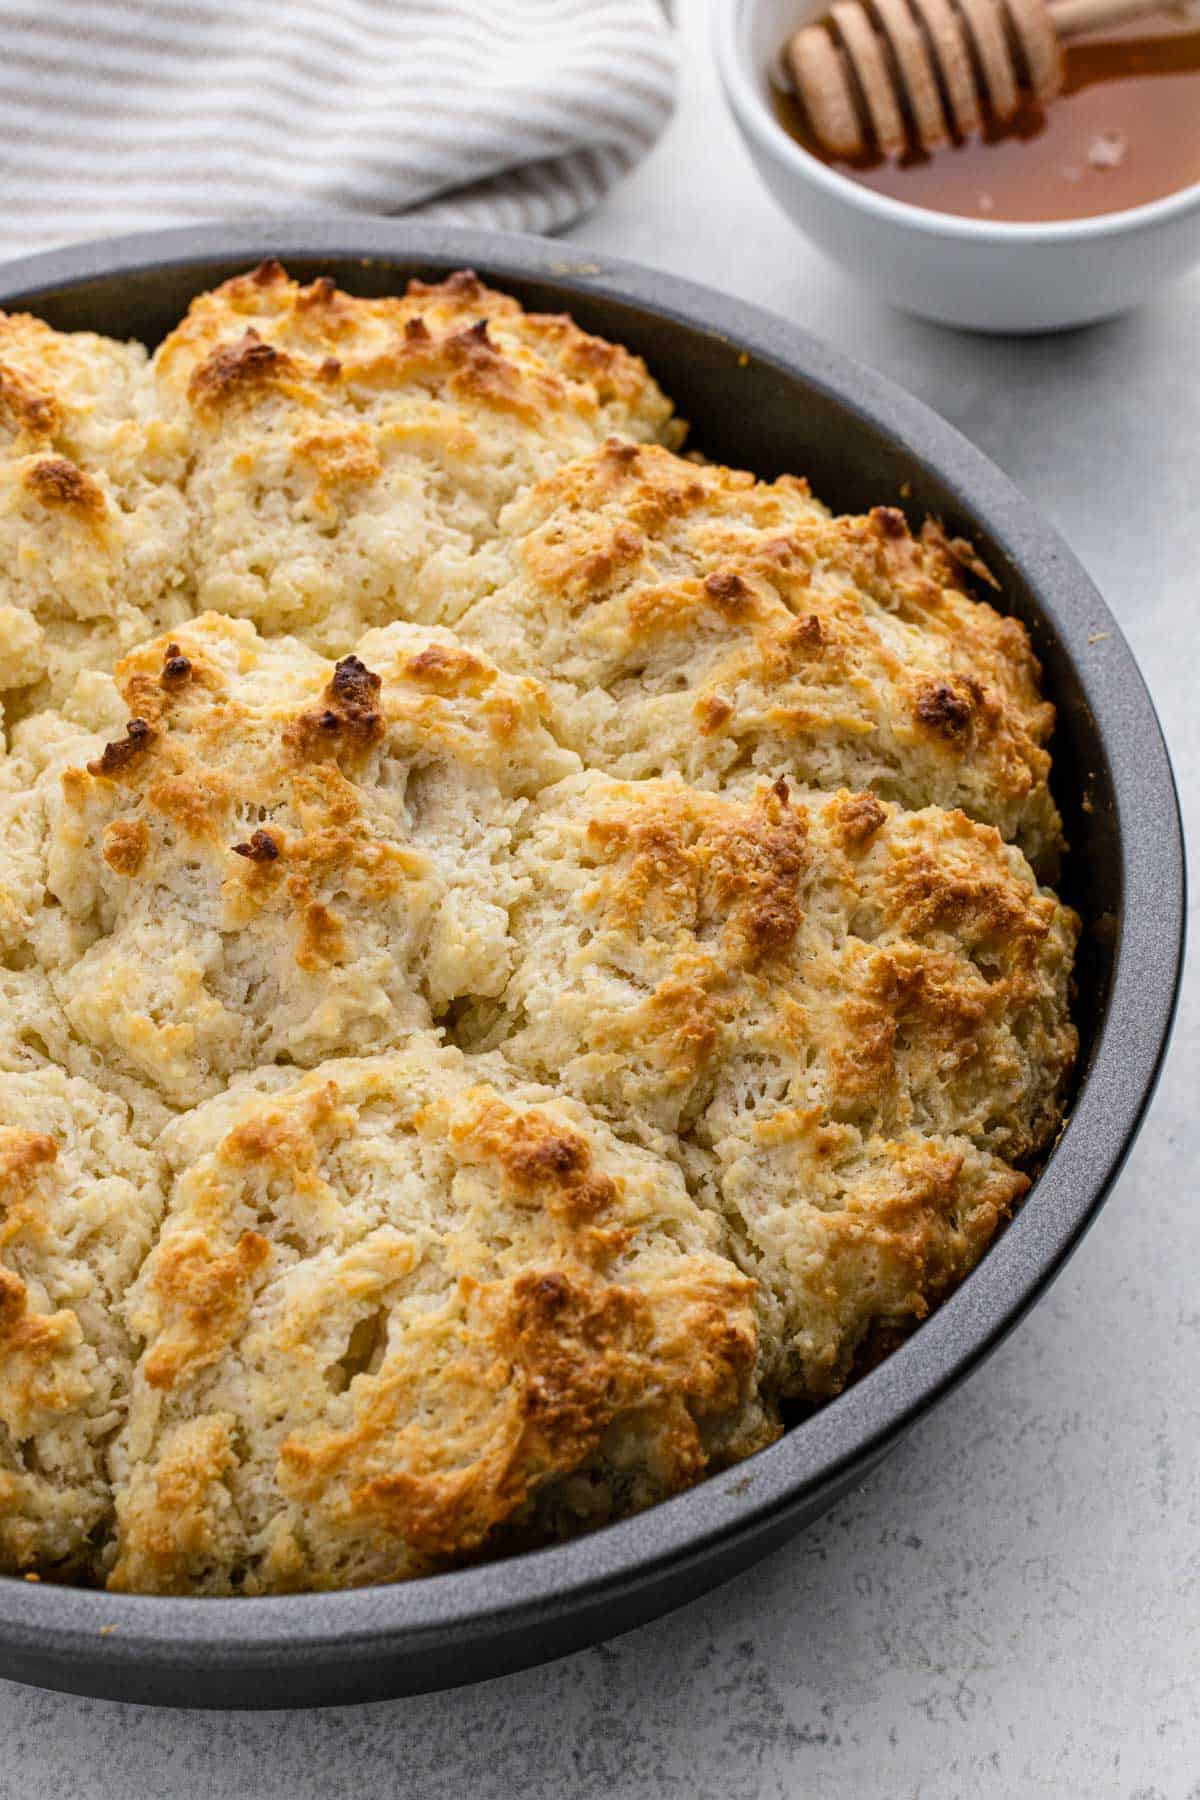
Y’all I love me some old school Cathead Biscuits. The best part is you probably already have everything in your pantry you need to make them. They bake up super fluffy and soft just like Southern buttermilk biscuits but we make them much easier using the drop biscuit method. Sometimes I just ain’t got time to roll and knead so using a measuring cup to scoop out the dough ends up being the move. Serve with butter, sawmill gravy, or just enjoy warm fresh outta the oven.
This post may contain affiliate links. Read our disclosure policy.
Cathead Biscuits Ingredient Tips
- Kosher Salt: Table salt also works but use less.
- Baking Powder & Baking Soda: Check the expiration dates so you get a good lift.
- Cold, Cubed Unsalted Butter: Cold butter creates those flaky layers we want. Salted butter can also be used. Just watch the salt you add.
- Buttermilk: As a swap, just mix 1 tablespoon of lemon juice or white vinegar with enough milk to make one cup. Let it sit for about 5 minutes and curdle before using.
How To Make Cathead Biscuits
Step 1: Prep The Cake Pan
- Prep a 9-inch cake pan by brushing it with butter over the bottom and sides.

Step 2: Make The Batter
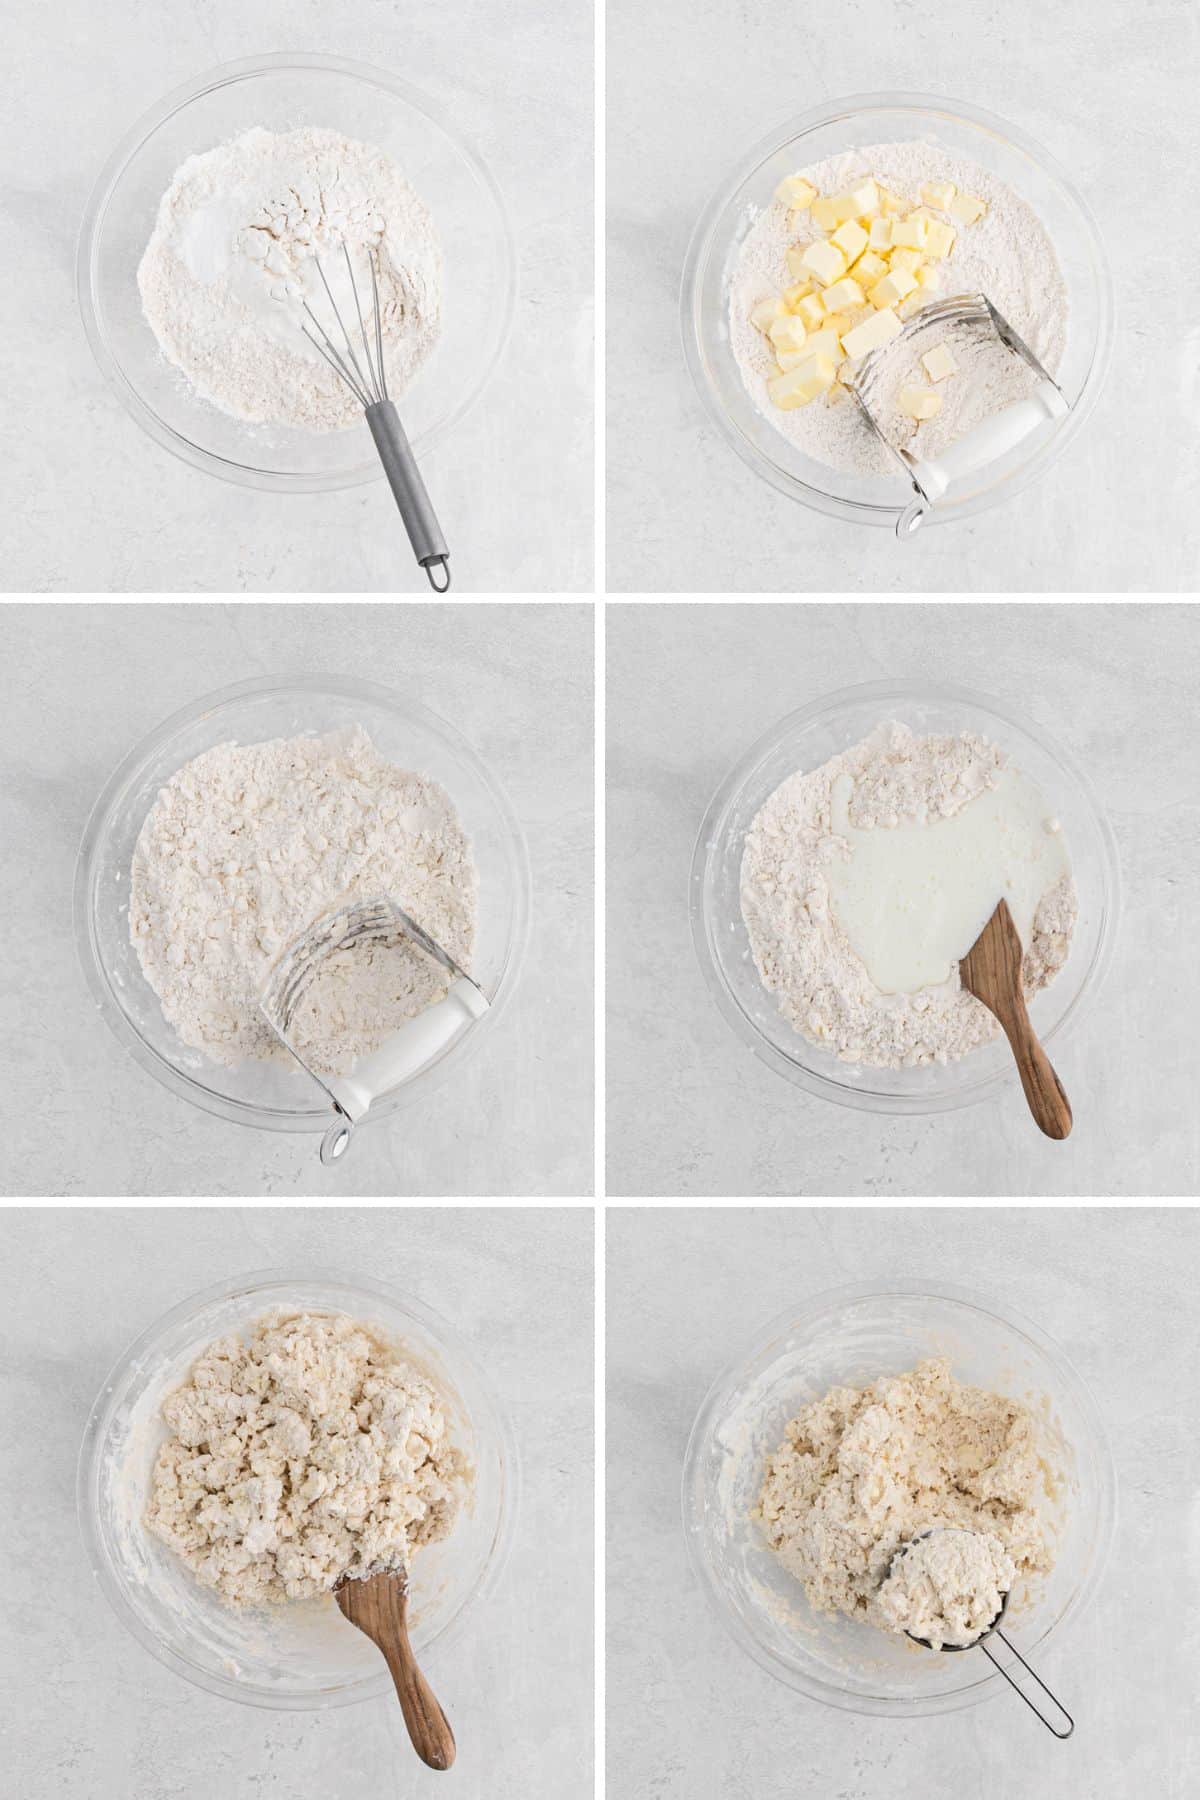
- Add flour, salt, sugar, baking powder, and baking soda to a large bowl and mix together.
- Add in cold cubed butter.
- Using two forks or a pastry blender, cut butter into the flour until all the butter is coated, and the butter is about the size of peas.
- Add in buttermilk and mix using a spatula.
- Keep mixing until just combined and most of the flour is absorbed.
- Divide dough into eighths using a ½ cup measure.
Step 3: Scoop And Bake The Biscuits
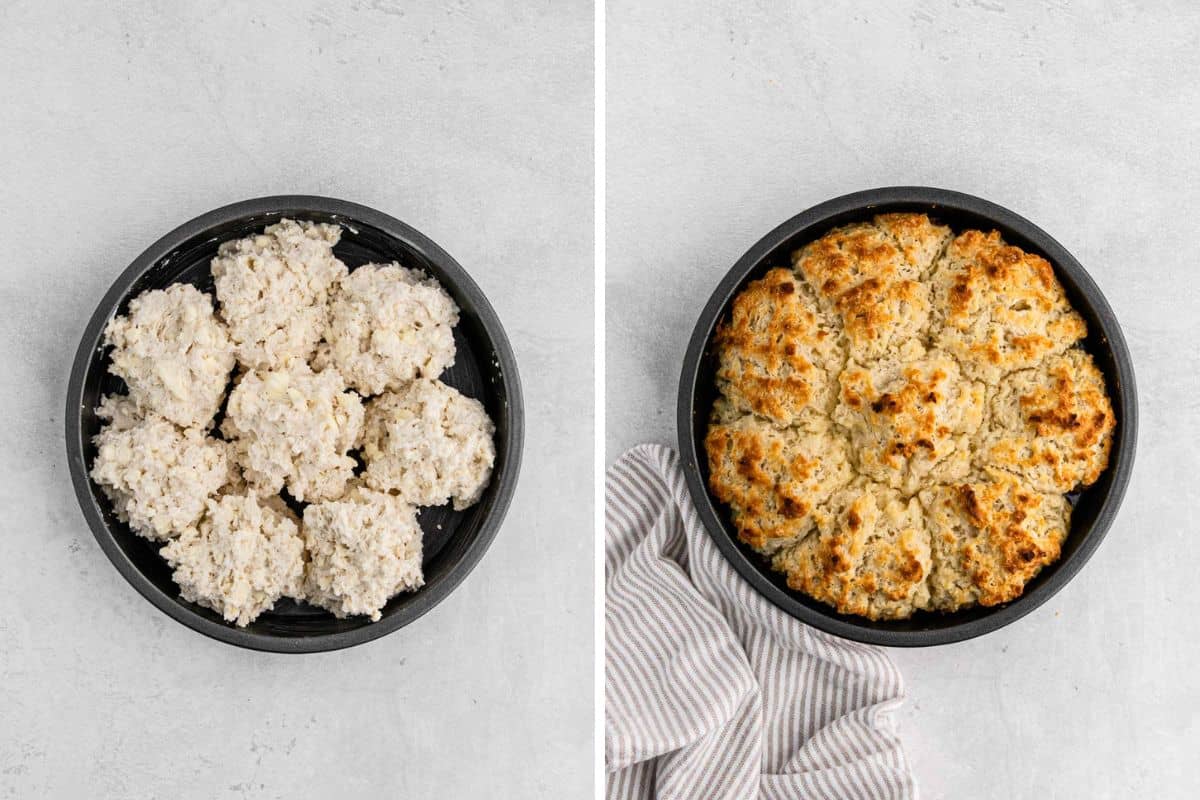
- Scoop dough into the prepared pan.
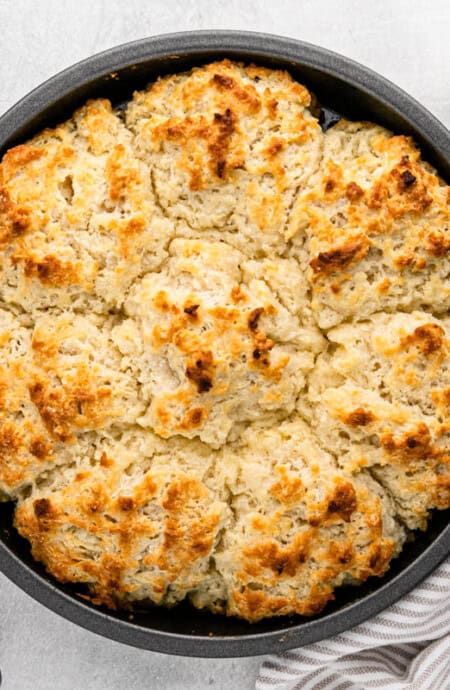
- Bake until the tops are craggy and deep golden brown.
Want to Save This Recipe, Boo?
Cathead Biscuits
Want to Save This Recipe, Boo?
Equipment
Ingredients
- 1 tablespoon unsalted butter melted
- 3 cups all-purpose flour
- 1 ¼ teaspoon kosher salt
- 2 teaspoons granulated sugar
- 1 ½ tablespoons baking powder
- 3/4 teaspoon baking soda
- 1 cup unsalted butter cold, cubed
- 1 ¾ cup buttermilk cold
Instructions
- Preheat oven to 425F. Place rack in middle position. Prep 9-inch cake pan by brushing with 1 tablespoon butter over bottom and sides.
- In a large bowl, mix together, flour, salt, sugar, baking powder, and baking soda. Add in cold cubed butter. Using two forks or a pastry blender, cut butter into the flour until all the butter is coated, and the butter is about the size of peas.
- Using a spatula, mix in buttermilk until just combined and most of the flour is absorbed.
- Divide dough into eighths and using a ½ cup measure, scoop dough into prepared pan.
- Bake until the tops are craggy and deep golden brown, about 22-25 minutes.
Notes
-
- Don’t Overwork the Dough: This is VERY important, y’all. When you’re mixing your biscuit dough, be gentle. Overmixing can melt the butter, leading to tough biscuits. So just mix until everything’s combined – no more.
-
- Use a Deep Cake Pan: For those perfectly golden and crispy edges, bake your biscuits in a deep cake pan. This helps them support each other as they rise, leading to that perfectly tall, cathead size.
-
- Keep Everything Cold: The secret to flaky, tender biscuits is keeping your ingredients cold. Use cold butter and buttermilk, and if the dough feels warm after mixing, pop it in the fridge for a few minutes. This helps keep those bits of butter intact!
-
- Sift Your Flour for Extra Fluffiness: For even lighter and fluffier biscuits, take a minute to sift your flour. This aerates the flour, making sure your biscuits rise to their full potential.
How To Store & Reheat Cathead Biscuits
To keep these fluffy cathead biscuits fresh after baking, let them cool completely and then store them in an airtight container or wrap them up tightly in plastic wrap or aluminum foil. You can leave them on the countertop if you’re planning to eat them within a day or two, or pop them in the fridge if you need them to last a bit longer. When you’re ready to enjoy a biscuit or two again, the best way to reheat them is in the oven. Preheat your oven to 350°F and warm them for about 5-10 minutes, or until they’re heated through and crisp on the outside.How Long Will They Last In The Fridge?
On the countertop, your Cathead Biscuits will stay fresh for about 1-2 days. In the fridge, they can last up to a week. Just make sure they’re stored properly!Can I Freeze?
Absolutely boos! If you’ve got more biscuits than you can handle right away, freezing is a great option. Wrap each biscuit individually in plastic wrap and then put them in a freezer bag. They’ll stay fresh in the freezer for up to 3 months. To reheat, you can either thaw it at room temperature or pop it straight into the oven from the freezer, adding a few extra minutes to the reheating time.Nutrition
Recipe Tips
- Don’t Overwork the Dough: This is VERY important, y’all. When you’re mixing your biscuit dough, be gentle. Overmixing can melt the butter, leading to tough biscuits. So just mix until everything’s combined then stop.
- Use a Deep Cake Pan: You get more golden crispy edges this way. It also supports the size of the biscuits so they end up tall.
- Keep Everything Cold: The secret to flaky, tender biscuits is keeping your ingredients cold. Use cold butter and buttermilk, and if the dough feels warm after mixing, pop it in the fridge for a few minutes.
- Sift Your Flour for Extra Fluffiness: For even lighter and fluffier biscuits, take a minute to sift your flour to add more air.
Recipe help
Flat biscuits can happen for a few reasons. If you overwork the dough or don’t use cold enough butter and buttermilk, it can happen.
Yep boos!! You can prep the dough and store it in the fridge for a few hours before baking. Just make sure to keep it covered so it doesn’t dry out.

More Biscuits Recipes
*Did you make this recipe? Please give it a star rating and leave comments below!* Post a photo of how your version of the recipe came out on Instagram (using #grandbabycakes)!!
 pinterest
These were easy to make and turned out great. I served with butter and local honey with our fried chicken dinner. Everyone loved the biscuits.
I just love homemade from scratch biscuits. These biscuits were great with our dinner, but I know they will be great with soup or gravy for a good old fashioned breakfast.
Very easy to make! Cathead biscuits looks so good and tummy too! I’d love to make to them later for my kids
I love how easy to make this cathead biscuit recipe, and the taste is really delicious!
This was my first time coming across cathead biscuits, but I will be making them again for sure. I was pleased at how simple they were to prepare, and enjoying them warm with lots of butter was absolute perfection!
Your Cathead Biscuits recipe is a delightful find! The simplicity of the ingredients and the no-fuss preparation method make it a joy for any home baker. The biscuits turned out beautifully golden with that perfect balance of a crisp exterior and a fluffy interior. It’s impressive how such a straightforward recipe can yield such delicious results. The tips provided were super helpful, especially the one about not overworking the dough. These biscuits were a hit at my table, and I’m already looking forward to making them again. Great job on this recipe!
These rustic cathead biscuits look and sound marvelous. I love that they are easy to make which means. I can make them anytime.
I made these biscuits with dinner last night and the whole family loved them! And I love how easy they were to make!
I love how rustic these look! So good, fresh and warm with melted butter and drizzle of honey.
I had never made this type of biscuits before but I’m absolutely loving this recipe!! It’s so much better than biscuits from the can, and surprisingly easy to make too. Definitely will be making this again!